Wednesday, December 31, 2014

Happy New Year -- Recipe Recap

Happy New Year!

2014 was a great year for me with the release of my second book, The Allergy-Free Pantry. The book has been very well-received by the food allergy community and I am honored that you are reading it and making my recipes.


As I prepare for 2015, here's a recap of a few of the recipes you can find in The Allergy-Free Pantry:

Potato Salad - not just for summer picnics.

Flaxseed Mayonnaise - If you try nothing else, you must try this!

Powdered Doughnut Holes - A fave!

Spinach Pasta - Save this one for a snow day.

Strawberry Thumbprints - They freeze well, too!

All of these recipes are gluten-free and top-8 allergen-free!


Monday, December 22, 2014

Strawberry Thumbprint Cookies for Santa (Recipe from The Allergy-Free Pantry)

Need some cookies to leave for Santa or Santa's little helpers? This great recipe from The Allergy-Free Pantry should do the trick! And there's no need to leave traditional milk for Santa. I know for certain that Santa loves hemp milk!

Looking for a top-8 allergen-free and gluten-free cookie for the holiday cookie swap? These strawberry thumbprints will wow them, for sure!

Strawberry Thumbprints
Makes about 28 cookies

Make these cookies with Strawberry Jam or another favorite jam. Ask the kids to help; a child’s thumb is just the right size to make thumbprints.

194 grams (about 1½ cups) gluten-free flour blend
½ teaspoon xanthan gum (omit if your flour blend contains a gum)
1 teaspoon baking powder
½ teaspoon salt
½ cup (110 g) organic cane sugar
10 tablespoons shortening, softened
1 Flaxseed Egg (1 tablespoon ground flaxseeds mixed with 3 tablespoons warm water)
1 teaspoon Vanilla Extract
¼ cup (61 g) Strawberry Jam

1. Combine the flours, xanthan gum, baking powder, and salt in a medium bowl.

2. In a separate large bowl, cream together the sugar and shortening using a mixer on medium speed for 5 minutes, scraping down the sides of the bowl as needed. The mixture will be light and fluffy.

3. Add the flaxseed egg and vanilla. Mix for 1 minute on medium speed.

4. Slowly add in the dry ingredients and blend on medium speed, about 2 minutes. The batter will be thick. Wrap the dough tightly in plastic and chill it for an hour. Cookie dough can be refrigerated for up to 2 weeks.

5. When you are ready to make cookies preheat the oven to 350°F (180°C). Line two large baking sheets with parchment paper.

6. Use your hands to shape the dough into balls, about 1¼ inches (3 cm) round.

7. Place the cookies on the baking sheet with space in between and flatten them just slightly. Use the tip of a finger, your thumb, or the back of a small spoon to create a small well in the center of each cookie.

8. Fill the center of each cookie with ¼ teaspoon of jam.

9. Bake each sheet of cookies separately in the center of the oven for 15 to 16 minutes, until the jam centers are sizzling and the edges of the cookies are golden. Let the cookies cool on the baking sheet for 5 minutes, then transfer them to a cooling rack. Store them in an airtight container at room temperature for up to 3 days.

To freeze
Baked cookies can be frozen in an airtight container for up to 3 months; thaw them at room temperature. Cookie dough (prepared through step 4) can be frozen for up to 6 months; thaw the dough in the refrigerator before forming cookies, filling with jam, and baking.

Credit line: Recipe from The Allergy-Free Pantry: Make Your Own Staples, Snacks, and More Without Wheat, Gluten, Dairy, Eggs, Soy or Nuts, copyright © Colette Martin, 2014. Reprinted by permission of the publisher, The Experiment. Available wherever books are sold.

Merry Christmas!

Cookie assortment from The Allergy-Free Pantry. Find your top-8 allergen-free cookie right here.

Tuesday, December 16, 2014

Gluten-Free Spinach Pasta from The Allergy-Free Pantry

Who agrees that winter is the best time for pasta? It just might be the ultimate comfort food. If you are tired of the same brand of food-allergy-safe off-the-shelf pasta, try making your own. There is nothing quite like homemade pasta, and you can control the ingredients (including the flours used).

The best tool I have found to make pasta is an attachment to my Kitchen Aid stand mixer. The KitchenAid KPEXTA Stand-Mixer Pasta-Extruder Attachmentis what I use. Keep in mind that homemade pasta boils much faster than dried pasta from the grocery store. It only needs a couple of minutes. Trust me on that!

Here's my favorite homemade pasta recipe from The Allergy-Free Pantry. Pair it with any of the sauces found in the book. I'm partial to Marinara Sauce with Spinach Pasta.


Spinach Pasta

Makes 4 servings

Spinach adds fiber and nutrients to plain pasta. Cook some extra spinach for dinner and save some to make pasta the next day. Use about 2 cups (60 g) of fresh spinach to make ¼ cup (45 g) of spinach puree (see note below). Serve it with Marinara Sauce for a colorful meal.

¼ cup (45 g) cooked spinach, drained
2 tablespoons flaxseed meal
2 to 4 tablespoons warm water, plus more for boiling
96 grams (about ¾ cup) brown rice flour
60 grams (about ½ cup) millet flour
32 grams (about ¼ cup) tapioca starch
½ teaspoon xanthan gum
1¼ teaspoons salt
2 tablespoons light olive oil

1. Puree the cooked spinach, flaxseed meal, and 2 tablespoons of the warm water in a food processor. Let it sit for 8 to 10 minutes. The mixture will be smooth and creamy.

2. Combine the flours, starch, xanthan gum, and ¼ teaspoon salt in a medium bowl and mix them together well.

3. Combine the spinach mixture and oil in a large bowl.

4. Add the dry ingredients to the wet ingredients and stir them together until crumbly. Test to see if the dough holds together by forming a small ball. Add up to 2 tablespoons of water as needed, 1 teaspoon at a time, until the mixture is stiff, yet smooth. The amount of water you need to add will vary based on how much moisture remains in the spinach.

5. Form tightly packed balls from the dough.

6. Use a pasta machine or extruder, following the directions for your tool, to form pasta in the desired shape, or form the pasta by hand.

7. Fill a pasta pot with water and 1 teaspoon of salt. Bring it to a rolling boil before adding the pasta.

8. Cook the pasta for 1 to 3 minutes. Drain, add sauce, and serve.

To cook the spinach

Steam 2 cups (60 g) of fresh spinach leaves with 2 tablespoons of water in a medium saucepan over high heat for 2 to 3 minutes, until the leaves are tender. If using frozen spinach, prepare according to package directions.


Recipe from The Allergy-Free Pantry: Make Your Own Staples, Snacks, and More Without Wheat, Gluten, Dairy, Eggs, Soy or Nuts, copyright © Colette Martin, 2014. Reprinted by permission of the publisher, The Experiment. Available wherever books are sold.

Thursday, December 11, 2014

Eat, Drink, and Be Merry with Udi’s Gluten Free!

It felt like Christmas came early when I opened a complimentary package from Udi’s Gluten Free and found a box full of goodies.

I must tell you a little about my personal history with Udi’s. While Udi’s breads (and most of their gluten-free goodies) are off-limits for my son due to his egg allergy, Udi’s whole grain bread has long been my choice for my own sandwiches. I am always thrilled to find Udi’s products at the restaurants I frequent, and on more than one occasion Udi’s has been my savior at a conference where they are sampling products (and the conference food line is lacking). So yes, I love Udi’s.

I hadn’t yet tried most of the products they shipped to me to review, and some are new. Gotta love that they are stepping up to meet the needs of our community!


My first sampling was with a duo of muffins – one sweet, one savory (but still sweet enough). The muffins are gluten-free, dairy-free, soy-free, and nut-free (but do contain eggs).


I was very excited to find burritos in my goodie box. Burritos, and more burritos. Burritos for breakfast, lunch, or dinner. Gluten-free burritos made with flour tortillas (happy dance!). The burritos contain milk and eggs.


I think these burritos are perfect for a grab and go breakfast or lunch.

If it’s bread you’re craving…

Udi’s now goes well beyond the classic sandwich bread. Check out these Whole Grain dinner rolls, Classic dinner rolls, and French baguettes:


One again, these are all gluten-free, dairy-free, and soy-free, but do contain eggs. Keep them in the freezer and take them out as needed for your gluten-free guests. Just remember not to serve them in the breadbasket with wheat rolls, and give your gluten-free guest a separate  dipping dish.

After the party’s over and you don’t feel like working too hard for dinner, try these flour tortillas and pizza crusts (both also contain eggs):


As an alternative, use the tortillas to make your own chips for dipping into hummus. Cut them into triangles, add spices (if desired) and bake in a single layer until crispy.

My favorite find in my goodie package was the Steel Cut Oats:


Yes, we now have choices for gluten-free oatmeal. Hooray for that! But a great source for gluten-free steel cut oats has been elusive. I should note that this item is gluten-free, dairy-free, soy-free, and egg-free, but processed on a line that processes tree nuts. I think oatmeal with currants, flax and chia sounds like the perfect post-holiday detox breakfast, don’t you?

And don’t forget to enter Udi’s #EatDrinkBeMerry holiday sweepstakes for a chance to win your own goodie package or free coupons:


Monday, December 8, 2014

Making Chocolate Croissants with gfJules Gluten-free Flour and Pascha Chocolate Chips

As many of you know, I often use off-the-shelf gluten-free flour blends when baking. In addition to testing these flour blends for use in the recipes in my books, it’s almost a hobby of mine (okay, maybe an obsession) to search for the best gluten-free flour blends. In my experiments, I have discovered that there is tremendous variance between flour blends. Some work well for certain baked goods and perform poorly for others. Still others perform poorly most of the time. Few perform well across a spectrum of baked goods.

One of the flour blends I recommended in Learning to Bake Allergen-Free was Jules Gluten Free All Purpose Flour Blend. Since 2012, when the book was published, Jules Shepard, creator of that flour blend, left the company she founded. But she is back in a big way and I am thrilled, Jules’ new company (gfJules) now makes an even better version of that flour blend. The gfJules Gluten Free Flour is made in a top-8 allergen-free facility and the flour is non-GMO. Happy dance!

The flour is shipped in a really clever box.


I decided to test the gfJules flour with one of my favorite recipes from Learning to Bake Allergen-Free – Chocolate Croissants.


But wait, I have more new products to talk about!

At the Springfield GFAF Expo, I ran into the folks from Pascha Chocolate who were introducing their new chocolate chips. That’s right. Pascha now makes chocolate chips. Does it get any better than that? Yes, it does, the new top-8 allergen-free chocolate chips come in 55%, 85%, and 100% cacao. Not only do we now have another choice for food-allergy friendly chocolate chips, but the 100% is essentially baking chocolate – something very hard to find in a safe version. I am now singing while dancing!


I decided to use the 85% in my Chocolate Croissants, because I’m that kind of girl. (Many of you may prefer the 55% for a less bitter taste.) I chose not to drizzle chocolate on top of my croissants because the rich taste of the chocolate inside was enough.


The bottom line: I am thrilled with both of these products. gfJules Gluten Free flour performed flawlessly, and when paired with Pascha chocolate chips we have a winning combo!

You can find the recipe for the chocolate croissants here.

Thursday, December 4, 2014

Which Cookbook Should I Buy?

It’s a question I never dreamed I’d have to answer, but one that has come up frequently as I’ve talked to people at recent signing events.

When someone is standing in front of me holding a copy each of Learning to Bake Allergen-Freeand The Allergy-Free Pantry, and asks which they should purchase, I stumble and trip over my response. Asking me that question is akin to asking me which of my children is my favorite. Of course I love them both equally, but they are different. The same is true with my books.

There are things the two books have in common:

Both books contain explanations of ingredients, tools, and techniques. You will find sections on replacing wheat, replacing dairy, and replacing eggs in each book (with a little more detail in Learning to Bake Allergen-Free).

Both books are more than just the recipes. They are meant to be read and referred to. I care less about whether you make my recipes than whether you learn something from the techniques and substitutions I show you, so that you feel empowered to make whatever you want with the ingredients available to you!

Both books contain recipes that are free of the top 8 food allergens and gluten. Both books contain suggestions for further substitutions, because one size doesn’t fit all when it comes to food allergies.

There are also some differences:

Learning to Bake Allergen-Free is all about baking (and only baking), from simple to more difficult. The book does not assume any prior baking experience and explains even simple techniques. So many of us who are baking to accommodate food allergies are doing so because we have to, yet we have limited time and a variety of skill.

Learning to Bake Allergen-Free is perfect for those baking for the first time or for traditional bakers who need to learn new ingredients and techniques. The book contains “crash courses,” which are often cited as the most valuable content in the book. Many people (including teens) have told me that they have learned how to bake using this book.

The Allergy-Free Pantry goes beyond baking, including recipes for everything you need to stock your pantry to replace the processed foods you used to buy at the grocery store. You will find recipes for condiments, jams, and salad dressings, as well as options for breakfast, lunch, and dinner, AND some baking recipes too! When I first pitched this book I described it as “Allergy-Free Homemade,” because it’s all about making food, safely, at home.

If you are tired of reading labels for packaged foods at the grocery store, or you have allergies beyond the top 8 (such as corn or rice) then The Allergy-Free Pantry just might be a necessity.

If you are a visual learner you will appreciate the how-to photos in both books, but The Allergy-Free Pantry contains many more photos – one for every recipe!

If you are trying to decide which book to put on your Christmas list or purchase for someone special, consider this:

If you love muffin tins, parchment paper, and your stand mixer, choose Learning to Bake Allergen-Free.

If you love cookie scoops, Ball jars, and your food processor, choose The Allergy-Free Pantry.

If you really can’t decide, keep in mind that the two books work beautifully together and with other food allergy cookbooks in your library!

Monday, December 1, 2014

Making Flaxseed Mayonnaise - How to Video

I recently had the opportunity to present at The Guilderland Public Library as part of their fabulous "healthy food" speaker series. I enlisted a friend to videotape me making Flaxseed Mayonnaise from The Allergy-Free Pantry:


You can find the full recipe here.

Monday, November 24, 2014

Coffee Cake with Streusel Topping from Learning to Bake Allergen-Free

This Coffee Cake from Learning to Bake Allergen-Freeis the type of breakfast treat I like to serve when company comes for the holidays. Make it ahead so that you can focus on the turkey and stuffing (gluten-free, of course) on Thanksgiving.

One of my favorites from Learning to Bake Allergen-Free - easy to make and satisfying to enjoy. Gluten-free, top-8 allergen-free, and vegan.

Coffee Cake with Streusel Topping

Did you know that most coffee cakes don’t contain coffee? They get their name because they are intended to be served with coffee, which makes them the perfect treat for breakfast. My favorite part of a coffee cake is always the streusel topping—just enough sugar to wake you up.

The technique used here to create the streusel topping is one that will be used frequently when making cookie dough and pie crusts.


Makes 12 to 16 Servings

For the Cake:
2 cups (256 grams) of your favorite gluten-free flour blend
½ teaspoon xanthan gum (leave out if your flour blend contains xanthan gum)
3 teaspoons baking powder
½ teaspoon salt
4 tablespoons (½ stick) Earth Balance Natural Shortening, softened (see tip)
½ cup granulated sugar
3 teaspoons Ener-G Egg Replacer mixed with 4 tablespoons warm water (equal to 2 eggs)
½ cup unsweetened applesauce
1 cup coconut milk beverage (see tip)
1 teaspoon vanilla extract

For the Streusel Topping:
2/3 cup gluten-free oat flour
¾ cup light brown sugar
3 tablespoons Earth Balance Natural Shortening, cold

1. Preheat the oven to 350°F. Spray a 9-inch square baking dish with cooking oil.

Prepare the Cake Batter:

2. Mix together the flour, xanthan gum (if needed), baking powder, and salt in a medium bowl. Set it aside.

3. Cream together the shortening and granulated sugar in a large bowl, with a mixer on medium speed, for about 5 minutes, until a textured paste forms. Scrape down the sides of the mixing bowl as needed.

4. Add the egg replacer mixture, applesauce, coconut milk, and vanilla to the creamed sugar. Blend with a mixer on medium-low speed for 2 to 3 minutes.

5. Gradually add the flour mixture and blend on medium speed, about 2 minutes.

6. Pour the batter into the baking dish, spreading it to the sides of the pan.

Prepare the Streusel Topping:

7. In a large mixing bowl, combine the oat flour and brown sugar, using a pastry cutter or pastry fork.

8. Cut the shortening into tablespoon-sized pieces. Use the pastry cutter to work the shortening into the flour.

9. Crumble the streusel topping over the batter.

10. Bake at 350°F for 32 to 36 minutes.


Tips

• Note that the shortening for the cake is used at room temperature, whereas the shortening for the topping is used cold. Plan to let just the 4 tablespoons sit out to soften and leave the remainder in the fridge until you need it for the streusel.
• If you need to avoid coconut due to an allergy, substitute hemp milk or rice milk for the coconut milk.


Credit line
: Recipe from Learning to Bake Allergen-Free: A Crash Course for Busy Parents on Baking without Wheat, Gluten, Dairy, Eggs, Soy or Nuts, copyright © Colette Martin, 2012. Reprinted by permission of the publisher, The Experiment. Available wherever books are sold.

Coffee Cake with Streusel Topping from Learning to Bake Allergen-Free. Perfect for your guests with mutliple food allergies. Also gluten-free and vegan. y breakfast

Thursday, November 20, 2014

What Should My Gluten-Free Batter or Dough Look Like?

One of the biggest challenges when baking gluten-free, (dairy-free, and egg-free) is to ensure that the consistency of your batter or dough is correct. While this is also true when baking with wheat, the simple reality is that most wheat flours behave pretty much the same – so the variance in the batter made from the same recipe is minimal. In contrast, gluten-free flour blends behave differently depending on the grains used, the amount of starch, and even the brand of the flours used. Therefore, it is critical to adjust the amount of liquids used based on look and feel of the batter or dough.

I like to think of batters and dough on a spectrum from wet to dry.

Cakes and cupcakes are made with the wettest batters. The batter should pour easily into a cake pan or cupcake tin. These are the most forgiving baked goods to make; if the batter is too wet, simple bake a little longer. Cake and cupcake batter can be made with an electric mixer or mixed thoroughly by hand. Pancake batter also fits in this category.

Muffin and quick bread
batters are also very forgiving. These are less wet than cake batter, but should be easily “scoopable.” My preference is to mix the batter with an electric mixer, and then stir in add-ins (e.g., blueberries) by hand.

Scones and biscuits
are next on the spectrum. Here the batter is still on the wet side, but should be able to be shaped with your hands or tools while retaining their shape. When using an electric mixer the batter should pull away from the sides of the bowl. If you start with a batter that is too wet, add more flour. Most yeast breads, pizza dough, and rolls also fit this category.

Cookie dough
is much drier than the batters discussed above, but instead of fully incorporating the ingredients, there should be small bits of shortening in the dough. Here, just enough liquid should be used so that the dough is easily pliable. Some cookie dough should be made with an electric mixer (when a technique called “creaming” is used), but most cookie dough is best prepared with a tool that allows you to cut the shortening into the dough – while still leaving small chunks of shortening. Cookie dough should be about as wet as the sand you would use to make a sandcastle. After chilling, cookie dough should be able to be easily shaped or sliced.

Dough for pie crust is just a shade drier than cookie dough. It should be smooth but dry. As with cookie dough, pie dough is best prepared with a cutter. When preparing cookie dough or pie dough, add the liquids slowly (1/2 tablespoon at a time) until the correct consistency is reached. Usually pie dough will need to be rolled out with a bit of flour.

Cracker
dough is very dry. You should be able to roll the dough into a tight, smooth ball that feels a lot like play-doh. Perfectly prepared cracker dough should be very easy to roll out between two sheets of parchment, without adding flour. Unlike cookie and pie dough, cracker dough is usually not refrigerated before rolling out and the fats/oils are fully incorporated into the dough.

Pasta
dough is the driest of them all. In fact, there is only enough moisture in pasta dough to keep it together. The pasta will pick up moisture from the water it is boiled in (and you want it to hold its shape as you cook it). Both cracker dough and pasta dough should be massaged with your hands after mixing the ingredients together with a spoon.

So there you have it – a spectrum of batters and doughs, from very wet to extremely dry!

Monday, November 17, 2014

Strawberry Tartlets from Learning to Bake Allergen-Free

Have you decided what to bring for dessert on Thanksgiving yet? This recipe for Strawberry Tartlets from Learning to Bake Allergen-Freemight just do the trick!

If strawberries aren't your thing, switch it up with different pie fillings. Apple, perhaps?
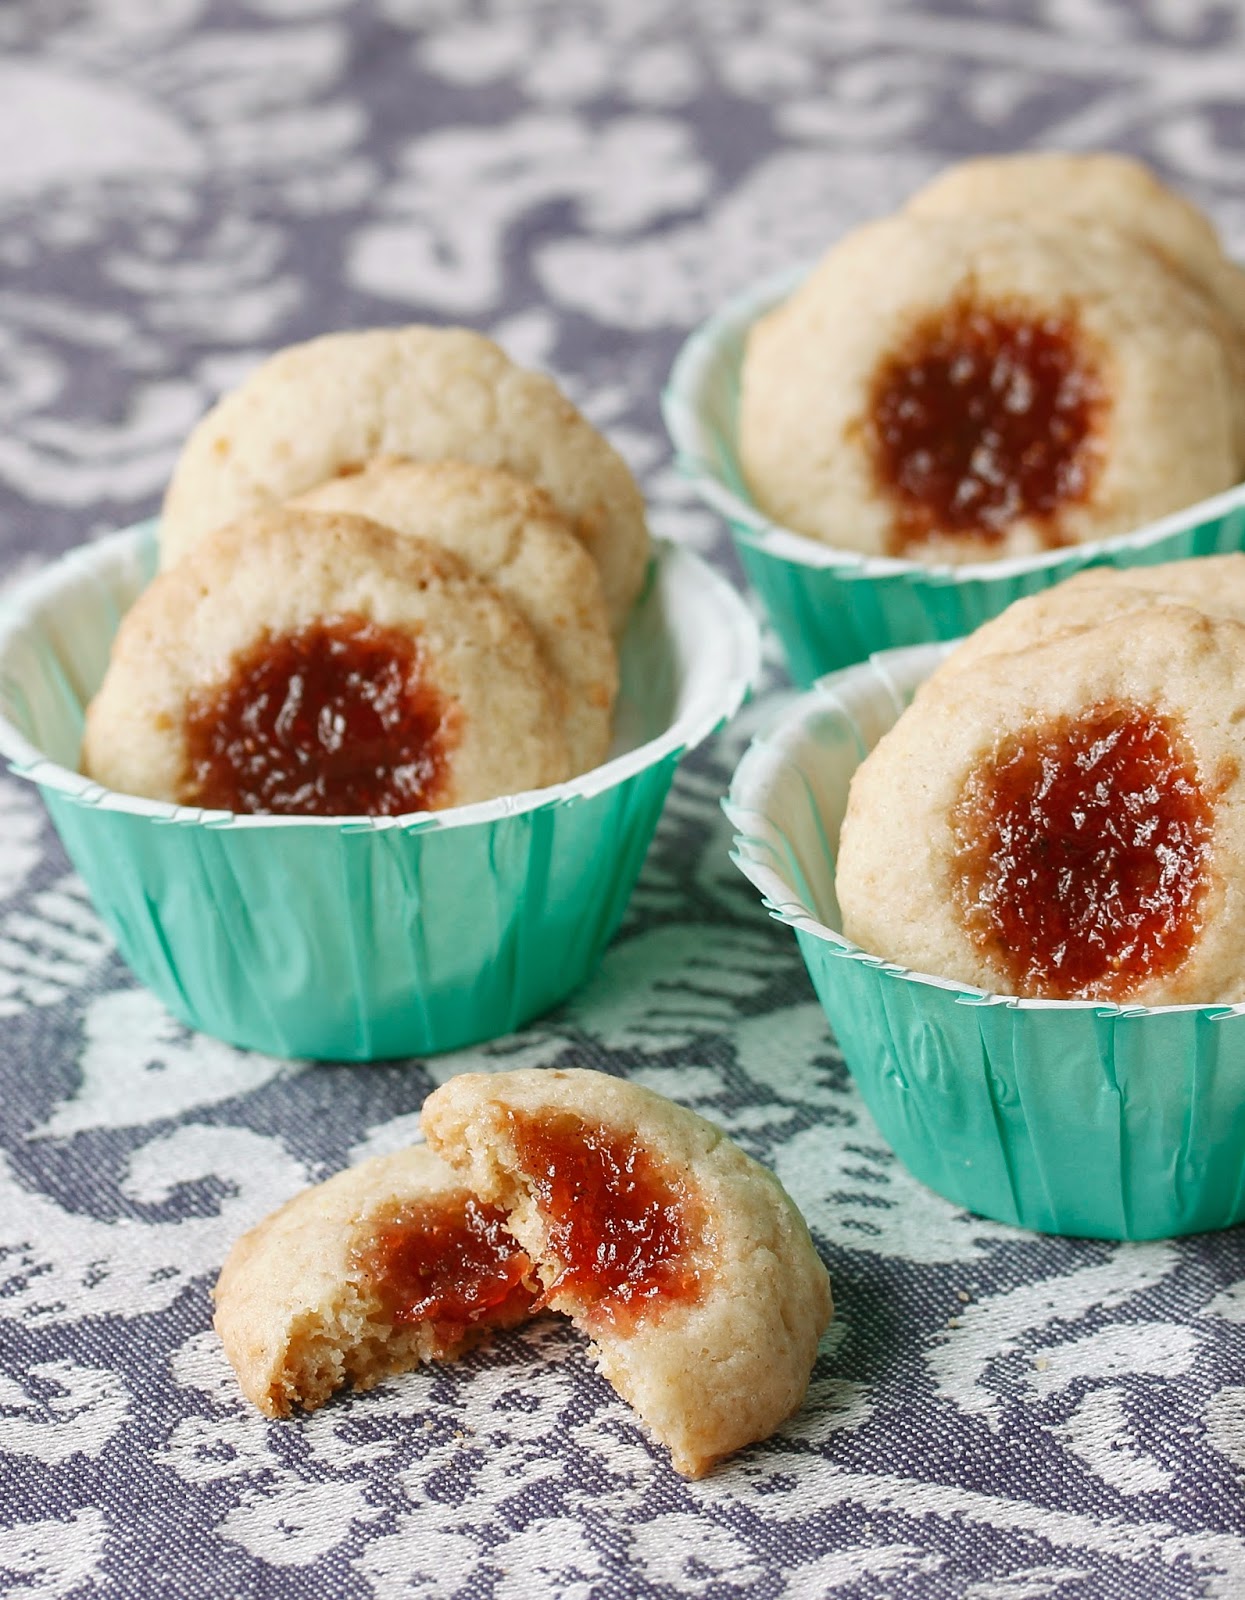

Strawberry Tartlets

In the Hudson Valley where my family lives, we belong to a Community Supported Agriculture program called the Poughkeepsie Farm Project. Every week from late spring through fall I look forward to fresh vegetables. But my favorite part of the weekly trip to the farm is the pick-your-own berries. There is absolutely nothing that can compare to juicy ripe strawberries fresh from the field. When I first joined the CSA and saw how many strawberries we would be taking home every week, I knew I had to develop a recipe that would leverage the sweetness of those strawberries but not overpower them.

This tartlet recipe simplifies the concept of a pie, while giving it a natural, rugged feel. It works well with all varieties of strawberries, taking you through the summer. It can also be made with any other berry, or a combination of berries. Have fun with it!


{ Makes 4 tartlets }

For the tartlets:
1 cup gluten-free flour blend
¼ teaspoon xanthan gum (leave out if your flour blend contains xanthan gum)
½ teaspoon salt
1 tablespoon granulated sugar
4 tablespoons (½ stick) Earth Balance Natural
Shortening, cold
1 tablespoon apple cider vinegar
1 to 3 tablespoons cold water (as needed)

For the strawberry filling:
1 cup sliced strawberries 
1½ teaspoons fresh lime juice
1½ teaspoons tapioca starch
1½ teaspoons granulated sugar
2 tablespoons raw sugar (optional)

Prepare the tartlet crusts:

1. Combine the flour, xanthan gum (if needed), salt, and granulated sugar in a large mixing bowl.

2. Cut the shortening into tablespoon-sized pieces and place them on top of the flour mixture. Use a pastry cutter or pastry fork to cut the shortening into the flour mixture.

3. When the flour and shortening are crumbly, add the apple cider vinegar and 1 tablespoon of cold water. Continue cutting the ingredients together.

4. Add up to 2 tablespoons additional water, ½ tablespoon at a time, as needed. Continue cutting until the dough forms.

5. Separate the dough and use your hands to create four equal-sized balls. Flatten the balls. Cover with plastic wrap, and refrigerate for at least an hour.

6. When you are ready to roll out the dough, preheat the oven to 350°F. Spray a cookie sheet with cooking oil.

Prepare the filling:

7. Coat the strawberries with lime juice.

8. Combine the tapioca starch and the granulated sugar. Mix this together with the strawberries, by hand, and then set it aside.

Roll out the dough and form the tartlets:

9. Place the dough on a smooth prep surface.

10. Using a rolling pin, gently roll each disk into a thin crust, about 6-7 inches round.

11. Use a spatula to gently lift the crusts and place them on the prepared cookie sheet.

12. Scoop the strawberry mixture into the centers of the crusts. Discard any remaining liquid.

13. Form the tartlets with your hands by folding the edges of the crusts over the berry filling, leaving the center open. Repair any broken pieces of crust with your fingers and a dab of water, if needed.


14. If a sugar crust is desired, use your fingers to sprinkle raw sugar over the folded crusts.


15. Bake at 350°F for 20 to 25 minutes, until the crusts are lightly browned and the strawberry filling is bubbling.

Tip:
The dough will work best if it’s refrigerated for at least an hour prior to rolling it out. It can be made ahead and stored in the fridge overnight, or even frozen. If you are using frozen dough, thaw it in the refrigerator before using it.

Credit line
: Recipe from Learning to Bake Allergen-Free: A Crash Course for Busy Parents on Baking without Wheat, Gluten, Dairy, Eggs, Soy or Nuts, copyright © Colette Martin, 2012. Reprinted by permission of the publisher, The Experiment. Available wherever books are sold.


Thursday, November 13, 2014

DenadaDenada Cooking Gift Set Review and Coupon

This tool set might be the perfect stocking stuffer for anyone who lives in a small space or a college dorm, but I also love the set for every day use in the average kitchen. Disclosure: The folks at DenadaDenada sent me a free sample of this Cooking Gift Set to try out and review.


The set contains a whisk, a spatula, a spoonula, and a brush, all packaged inside a 10-inch by 2.5-inch by 2-inch box.

My first reaction when I saw the product was that these are the exactly the kind of tools that families with food allergies will love! They fit my description of what to look for when buying tools to avoid contamination. These brightly colored tools are made from BPA-free silicone. Except for the whisk they are one-piece construction – no cracks or crevices for tiny food particles to hide. They wash up beautifully in the dishwasher.


But what I love best about these tools is the size.

I am becoming increasingly frustrated with the oversized plates, pans, and utensils on the market. Did you know that dinner plates have grown in size from 9 inches to 12 inches over the past few decades? A plate that’s larger than 10.5 inches doesn’t even fit in my kitchen cabinet. But I digress…

Some might look at these tools and say they are small, but I think they are sized just right. It’s much easier to fill a muffin cup or scoop the last bits of sunflower seed butter out of a jar with a small spatula than it is with the enormous ones that don’t even fit inside a jar or prep glass. And I’ll choose a 10-inch whisk over a 12-inch whisk any day – whether it’s to whip up salad dressing or pancake batter, the smaller sized whisk will perform better.


I am simply loving this set!

Whose stocking do you need to fill this year? Consider buying a DenadaDenada Cooking Gift Set at amazon. Enter MOMS5OFF in the promo code field to receive $5 off. 

Monday, November 10, 2014

Powdered Doughnut Holes from The Allergy-Free Pantry

These Powdered Doughnuts are quickly becoming a reader favorite from The Allergy-Free Pantry.

If you need to avoid corn, make your own powdered sugar (there's a recipe in the book!)

These Powdered Doughnut Holes from The Allergy-Free Pantry are baked in a mini-muffin pan. Gluten-free, allergy firendly, vegan.

Powdered Doughnut Holes

Makes 24 doughnut holes

This is the solution for an early-morning status meeting or an allergen-free classroom treat. These muffins have that classic old-fashioned doughnut taste and are easily made in less than 30 minutes using a mini-muffin pan or doughnut hole pan.

288 grams (about 2¼ cups) Basic Flour Blend (below)
½ teaspoon xanthan gum
3 teaspoons baking powder
½ teaspoon salt
4 tablespoons shortening, softened
½ cup (110 g) organic cane sugar
1 Flaxseed Egg (1 tablespoon ground flaxseeds (measured after grinding) mixed with 3 tablespoons warm water)
¼ cup (60 ml) Hemp Milk or nondairy milk of choice
½ cup (120 g) Applesauce
2 tablespoons grapeseed oil
1 teaspoon Vanilla Extract
½ cup (72 g) Powdered Sugar

1. Preheat the oven to 350°F (180°C). Grease the cups of a mini-muffin pan or doughnut hole pan.

2. Combine the flour, xanthan gum, baking powder, and salt in a medium bowl.

3. In a separate large bowl, cream together the shortening and sugar using a mixer on medium speed for 5 minutes. Scrape down the sides of the mixing bowl, as needed.

4. Add the flaxseed egg and blend on medium speed for 1 minute. Add the milk, applesauce, oil, and vanilla, and blend for another minute.

5. Add the dry ingredients and mix on medium speed for 2 to 3 minutes, until well blended. The batter will be thick with some graininess.

6. Use a #40 cookie scoop or spoon to form balls of dough in tablespoon-sized portions. Dampen your hands with warm water and gently pass the dough from hand to hand until the ball is smooth. Place each ball of dough into the prepared pan. Dip the cookie scoop or spoon into warm water periodically, if the dough starts to stick.

7. Bake for 14 to 16 minutes, until a toothpick inserted comes out clean.

8. Let the doughnut holes cool for 5 minutes in the pan, then transfer them to a cooling rack.

9. Just prior to serving, roll the doughnut holes in the powdered sugar to coat them on all sides or sprinkle the powdered sugar on just the tops. Store (without the powdered sugar topping) in an airtight container at room temperature for 2 to 3 days.

Need to avoid corn starch? Make your own powdered sugar!

Variation
To make Cinnamon Sugar Doughnut Holes, sprinkle the tops of the doughnut holes with 3 tablespoons Cinnamon Sugar (page 286) prior to baking. Omit the powdered sugar.


Basic Flour Blend


306 grams brown rice flour
306 grams sorghum flour
156 grams arrowroot starch

Credit line
: Recipe from The Allergy-Free Pantry: Make Your Own Staples, Snacks and More Without Wheat, Gluten, Dairy, Eggs, Soy or Nuts, copyright © Colette Martin, 2014. Reprinted by permission of the publisher, The Experiment. Available wherever books are sold.

Kids love these Powdered Doughnut Holes from The Allergy-Free Pantry. Head on over Learning to Eat Allergy-Free for the recipe!

Monday, November 3, 2014

Chocolate No-Nut Crisp from Learning to Bake Allergen-Free

I hope you had a safe and enjoyable Halloween. If you are finding yourself (or your child) with a bag full of candy they can't eat. Here's an easy recipe from Learning to Bake Allergen-Free.

Use these treats to swap for Halloween candy that your child might not be able to eat.

No time to bake cookies? This Chocolate No-Nut Crisp from Learning to Bake Allergen-Free requires no oven time and will satisfy your sweet tooth!

Chocolate No-Nut Crisp

It can be difficult to find a chocolate bar that is made without milk (or traces of milk and nuts). This chocolate crisp is a make-your-own candy bar that can be prepared in minutes, without turning the oven on. Use your favorite non-dairy chocolate, or try this with different chocolates to see which you prefer.

For a special treat, spread a layer of sunflower seed butter (available at the grocery store) between two pieces of chocolate crisp. Yum!


Makes about 16 servings

2 tablespoons Earth Balance Natural Shortening
1¾ cups allergen-free chocolate chips
¾ cup gluten-free crisped rice cereal (see tip)

1. Line a 9-inch square pan with wax paper.

2. Melt the shortening in a medium saucepan over medium-low heat.

3. Add the chocolate chips and use a spoon to stir continuously while melting.

4. When the mixture is completely melted, remove the pan from the heat. Let it cool for 5 minutes.

5. Fold in the rice cereal.

6. While still warm, spread the mixture in the lined pan.

7. Refrigerate for at least 2 hours. The chocolate will harden.

8. Use the wax paper to lift the chocolate block from the baking dish. Cut or break the crisp into desired-size chunks and serve.

Tips

• My favorite crisped rice cereal is Erewhon Gluten Free Crispy Brown Rice cereal. It contains just three ingredients: organic brown rice, organic brown rice syrup, and sea salt.
• Be careful not to let the chocolate burn while it is melting. Stir continuously and keep the heat low.

Credit line
: Recipe from Learning to Bake Allergen-Free: A Crash Course for Busy Parents on Baking without Wheat, Gluten, Dairy, Eggs, Soy or Nuts, copyright © Colette Martin, 2012. Reprinted by permission of the publisher, The Experiment. Available wherever books are sold.

Start with dairy-free, nut-free, gluten-free chocolate, add gluten-free crisped rice cereal, and make your own candy bar!

Thursday, October 30, 2014

One Blender + One App = Smoothies!

I continue to be amazed by the super-talented Tess Masters. Releasing her first book, The Blender Girl, and blazing a trail around the world for her book tour simply wasn’t enough to accomplish in one year. Tess’s latest achievement is her new Smoothie app – The Blender Girl Smoothies app for iphone and ipad.

The new app, available on the itunes store for $4.99 has 70 smoothie recipes (and more coming). I love that you can search by ingredient. If you have lots of bananas, for example, search for smoothies that use bananas. Or, search using the ingredients that are safe for you and your family. The recipes also include special dietary information. For example, if you need more protein, or anti-inflammatory smoothies, you will find them here.

There’s something here for everyone (and it’s very allergy-friendly). Here’s an example of what you can find (this is the ipad view):


Don't you love the colorful smoothies?

Here’s a sneak peek of a smoothie recipe that contains some of my favorite ingredients (and who could pass up an anti-aging smoothie?):

pomegranate slam it!

With a complex, mind-blowing flavor that explodes like a firecracker (don’t omit the cayenne), this is a heart-healthy delight. Pomegranate lowers blood pressure, keeps arteries supple, decreases inflammation in blood vessels, and helps manage cholesterol. Its phenolic antioxidants (also in strawberries) combat oxidative stress, making this an anti-aging tonic.

Serves 2

1 1/2 cups (360ml) unsweetened pomegranate juice
1 orange, peeled, seeded, and quartered
1/4 cup (35g) chopped red bell pepper
1/8 cup (3g) loosely packed arugula
1/2 small avocado, pitted and peeled
1 cup (160g) frozen strawberries
1 cup (125g) ice cubes

Throw all of the ingredients into your blender and blast on high for about 1 minute, until smooth and creamy.

Boosters
1 tablespoon pomegranate powder
1/2 cup (15g) loosely packed chard leaves
Pinch of cayenne pepper

Credit and permission: Recipe from The Blender Girl Smoothies app © Tess Masters, copyright (c) 2014. Published by Ten Speed Press, an imprint of Random House LLC.
Photo by Erin Kunkel from The Blender Girl Smoothies app © Tess Masters, copyright (c) 2014. Published by Ten Speed Press, an imprint of Random House LLC.