Take a look at your camera settings. Is the dial set on auto? What about your ISO setting? Is that on auto too? If you’re trying to get a picture of your daughter scooting across the room, then auto it is. But if you want a great shot of food and your camera is on a tripod, ditch the auto settings and learn how to take advantage of that great camera equipment.
After a recent conference where I was on a panel discussing food photography, an audience member approached me afterwards with questions. Soon, we had her camera out and I was showing her how to really use it. What struck me at the time is that once you have a process for how to set your camera, it becomes much easier and you won’t have to spend nearly as much time “trying” to get the right shot.
This post is applicable to anyone with a DSLR or a point and shoot where you can select ISO, aperture, and shutter speed. These three settings work together to expose the “film” and produce a picture.
First, a short plea for why you shouldn’t use automatic (or any of the pre-set options such as sports) on your camera. When you use auto, the camera makes a choice each time it takes a picture. You could shoot the same image multiple times and get a different picture each time. Depending on where your focus is, how you have the metering set, and whether a cloud goes by, the camera will choose differently. In pre-digital days you would be wasting a lot of film. If you have a great camera and a fabulous lens your chances of the camera getting it right are pretty good, if you take a few shots. But instead of letting the camera decide, I suggest you take control back from the camera – it’s easier than you think.
Confession: I am a reformed aperture priority user. For a long time I believed that aperture priority was the way to go for food photography; so often we want to control the depth of field (the amount of the picture that is in focus) and draw the eye to the food being featured. And, unless you are trying to capture motion (a syrup drip, for example) aperture priority is a better option than shutter priority. Nevertheless, I have discovered that manual is nearly always better. That is simply because there is no guesswork involved. I always know what the output will look like.
Here’s my process for manual settings:
1. Set the ISO on 100. ISO is essentially the speed of the “film.” In the old days you might buy ISO 400 film for standard indoor photos, 100 or 200 for outdoors, and 800 for low light. The higher the ISO setting, the grainier the image will be (and who wants grainy images of food?). You will need some light, but it doesn’t have to be a lot of light. As long as your camera is on a tripod and you can set a long shutter speed, you can select ISO. Move the ISO up (200, then 400, etc.) only if you can’t get an accurate exposure at 100 (see step 3 below).
2. Choose your aperture. The aperture is how wide the lens opening is. The term “wide open” refers to the widest aperture setting on your lens. This will be the smallest number. Depending on the length of your lens (the mm number) whether you are using a crop frame camera or a full frame camera, and how close you are to the food, your depth of field (how much is in focus) will vary, even at the same f-stop (the aperture setting). On a full-frame camera with a 100mm macro lens, f4.0 is a good place to start for a picture where you want a blurry background (or foreground); on a crop frame camera with a 60mm macro, f3.2 is a good place to start. If you are doing a top down shot or you want (nearly) everything in focus, f8.0 is a good place to start.
3. Use the exposure meter on the camera to set the appropriate shutter speed. Start by setting the shutter speed so that the exposure meter is at zero. Take a picture. If it looks under-exposed or over-exposed change the shutter speed. Each click on the shutter speed dial will move the exposure meter one notch on the exposure meter. If you click the shutter speed up the exposure meter will move down; if you click the shutter speed down the exposure meter will move up. How far you want to go will depend on how under-exposed or over-exposed your first shot was. If you’re not sure, move one click at a time, taking pictures as you go. On my camera, I find that I usually have to go to +3/4 or +1 on my meter to get a correctly exposed shot. This will vary depending on the direction of your light, the amount of light, the color of your background, etc. This is where you should play a little bit.
If you are in low light and you can’t get a shot at ISO 100, then adjust the ISO until your camera exposure is within range. The wider open your aperture is, the lower you can set the ISO.
If you are shooting with some motion (such as a drip or pour), then reverse the process in steps 2 and 3. Set the ISO, then set the shutter speed and use the meter to determine the correct aperture setting.
4. Play. Try changing the aperture for a different effect. For every click up on aperture you will need to adjust one click down on shutter speed, and vice versa. It’s all very mathematical.
Try focusing on a different point in the shot. Are you on auto-focus? Stop that! Don’t let the camera decide what’s most important, pick your focal point. The viewer’s eye will be drawn to the focal point.
A word about white balance: This is where I say it’s okay to be on auto, as long as you are shooting in RAW or RAW+JPG. Software will allow you to change this easily, but if you know you are in tungsten light go ahead and select tungsten. The differences between daylight, shade, and cloudy, can be harder to judge.
Now, have I convinced you to choose your own camera settings?

Thursday, June 27, 2013
Monday, June 24, 2013
I’ll Be at the Gluten Free & Allergen Free EXPO in New Jersey
I’m heading off to Philly later this week to present and sign books at EOS Connection, APFED’s annual patient conference. I you are there please stop by and say hi!
My next big event following that is the GFAF Expo in Secaucus, NJ, September 7th and 8th. For those of you who know New Jersey, yes – that means at the Meadowlands. I have attended two GFAF Expos, both in the Chicago area. I can’t tell you how excited I am that there is finally an EXPO close enough for me to drive to. Yippee! (And that means I can bring lots of books without worrying about suitcase weight limits.)
The EXPO earlier this year in Chicago was a blast! In addition to the author area, there was a blogger area with lots of my blogging friends attending. And there was great food, and lots of goodies to bring home. I never worry about what I’m going to eat at these events. But that’s not the best part.
The best part is meeting people, sharing stories about food issues, helping people solve their baking issues, and talking to readers.

If you are in the greater NJ area, this is a must attend event! If you already have my book, bring it along and I’ll be happy to sign it for you.
Thursday, June 20, 2013
Two Camera Lenses Every Food Photographer Needs
I recently had the opportunity to be a speaker on a panel at BlogHer Food, titled “How to Fake Great Photos.” Of course the photos are very real, but there are so many things to learn about food photography and most of us are indeed faking it until we make it.
One thing we didn’t talk about at our session was gear. So much to cover and so little time. Today I want to talk about the two lenses every food photographer – specifically every DSLR food photographer – should have in their kit bag.
1. A macro lens. Macro lenses allow you to get up very close to the food (usually as close as a foot away), and they magnify the food. They are perfect for food shots where you want to highlight the details of the food. For a full frame camera, a 100mm macro lens is perfect; on a crop frame camera choose a 60mm lens.
 My macro lens is my go to lens for about 60% of the photos I take in my home studio.

2. A wide angle lens or a telephoto lens that starts at 24mm (or 17-18mm for a crop frame camera). Wide angle lenses are used for top down shots, shots where you want to capture more of the table, or when you have people in the photo.

I use a 24-105mm lens with my full frame camera, and a 17-55mm lens
  with my crop frame camera. If you can, I suggest buying a lens with image stabilization, as this will likely become your travel and walking around lens. If you are using the camera almost exclusively for food photography, a wide angle lens might be your choice. I have been working with the macro and telephoto lens for some time, but I am now saving up for a great 35mm lens.
 The fixed focal length should give me a sharper picture with less distortion.
I am a big believer is buying the best lens you can afford. Rather than choosing an inferior lens, save your money until you can get what you really want. While the camera itself provides some great functionality, the majority of the differences in the quality of a photo (in addition to the choices the photographer makes in his or her camera settings) is achieved with the lens. The links in this blog post are for Canon cameras. Make sure you select a lens that works with your camera!
What are your favorite lenses for food photography? Why?

One thing we didn’t talk about at our session was gear. So much to cover and so little time. Today I want to talk about the two lenses every food photographer – specifically every DSLR food photographer – should have in their kit bag.
1. A macro lens. Macro lenses allow you to get up very close to the food (usually as close as a foot away), and they magnify the food. They are perfect for food shots where you want to highlight the details of the food. For a full frame camera, a 100mm macro lens

2. A wide angle lens or a telephoto lens that starts at 24mm (or 17-18mm for a crop frame camera). Wide angle lenses are used for top down shots, shots where you want to capture more of the table, or when you have people in the photo.

I use a 24-105mm lens
I am a big believer is buying the best lens you can afford. Rather than choosing an inferior lens, save your money until you can get what you really want. While the camera itself provides some great functionality, the majority of the differences in the quality of a photo (in addition to the choices the photographer makes in his or her camera settings) is achieved with the lens. The links in this blog post are for Canon cameras. Make sure you select a lens that works with your camera!
What are your favorite lenses for food photography? Why?
Tuesday, June 18, 2013
Joining a CSA – Is it Worth it?
 Tuesday. CSA pickup day. My usual Tuesday routine this time of year is late afternoon yoga, followed by food pickup at the CSA. It’s the perfect zen ending to my day.
In case you have no idea what I am talking about, CSA means Community Supported Agriculture. While all CSAs are different, I never know what I’m going to get until I arrive and check the white board. Even with a small share, I usually have more than enough veggies to get us through the week.
I love belonging to the CSA. Besides the obvious benefits of locally grown, pesticide-free produce, going to the farm every week gives me a feeling of connectedness to the earth. It helps me feel grounded. And when I’m out in the field searching for berries or picking my own herbs, it’s peaceful. Not quiet, because there’s work going on around me, but there’s a calmness to the activity.
As I was leaving yoga last week a friend mentioned that she wanted to join a CSA but her husband wasn’t sure it was worth the cost. I had to admit that it was expensive – an expense that is noticeable because it’s paid in a lump sum, in advance. And just like the stock market, there are no guaranteed returns – if there’s a flood or a draught and the crops are lost, I might receive less in return.
If I prorate the cost on a per-week basis, we pay about $30 per week for a half-share. Usually that means five or six items per week. Last week I brought home one head of lettuce, a pound of potatoes, half a pound of arugula, half a pound of lettuce greens, one pound of broccoli, and a large bunch of scallions. If I had bought organic versions of those veggies at the grocery store I could probably do it for a little bit less – but just a bit.
I should note that my CSA is not certified organic – the cost to become certified would be prohibitive. In fact, it’s very difficult to find locally organic produce in my area. Nevertheless, it’s easy to find produce grown using clean, green, pesticide-free methods – and that’s what matters most to me.
So, is it worth it? My answer is a resounding yes!
I am supporting the local community with my share (the CSA also does a lot of community outreach).
It’s locally grown which means I am reducing my carbon footprint.
There is less waste because what I bring home from the CSA never seems to go bad.
It tastes better. (I don’t think I’m imagining that. It really does.)
And did I mention the berries? In addition to our share, when the berries are ripe we can pick our own:

No, they aren’t perfectly shaped, and they aren’t huge, but look at how red and juicy they are! These will be long gone before I get a chance to make jam out of them.
Do you belong to a CSA? Why would you choose to join? Or why not?

Thursday, June 13, 2013
Bob’s Red Mill Hearty Whole Grain Bread Mix
Once again I can’t recall whether the folks at Bob’s Red Mill sent this bread mix to me, or whether I purchased it on my own. I believe I received it at the same time as the Bob’s Red Mill Homemade Wonderful Bread Mix, and I am continuing to (slowly) bake my way through the stash of mixes I have acquired – adapting them to be made without adding eggs, butter, milk, or other top food allergens. And so my disclaimer (to satisfy the FTC) is that I may have received this bread mix to review from the folks at Bob's Red Mill.

This is a unique bread mix – one that is more complex in ingredients than most. There are multiple grains including buckwheat, garbanzo bean, sorghum, fava bean, and teff. The starches include potato, corn, and tapioca. Potato flour is also used. The mix includes both xanthan gum and guar gum. And there are seeds – sunflower, sesame, and caraway seeds. And that’s not all – there is cocoa powder, evaporated cane juice, molasses, salt, yeast, onion powder, and soy lecithin. The yeast packet is included.
The sheer number of ingredients in this mix makes it less viable for many of the food allergy families that visit here. Those who are gluten-free and dairy-free and/or vegan may find it a great choice for a hearty bread. It is lower in sugar and higher in fiber than most bread mixes.
 The only add-in item I needed to adapt was the eggs; I used ½ cup flaxseed gel instead. The other added ingredients are water, oil, and apple cider vinegar. If you decide to try it, watch your timer; my bread was done at 45 minutes (compared to the 60 to 65 minutes the package suggests it needs).
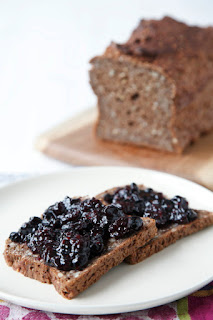
The bread is on the dense side but still very easy to slice. You can see it pictured here with homemade blackberry jam – a healthy start to the day!
I have also tried it with salami from Applegate Farms, sliced avocado, and homemade mustard. That was a very tasty sandwich!
I prefer the Homemade Wonderful Bread Mix to this one, as I found it to be more of an all-around bread and more likely to suitable for different dietary restrictions. If you try them, let me know what you think!

This is a unique bread mix – one that is more complex in ingredients than most. There are multiple grains including buckwheat, garbanzo bean, sorghum, fava bean, and teff. The starches include potato, corn, and tapioca. Potato flour is also used. The mix includes both xanthan gum and guar gum. And there are seeds – sunflower, sesame, and caraway seeds. And that’s not all – there is cocoa powder, evaporated cane juice, molasses, salt, yeast, onion powder, and soy lecithin. The yeast packet is included.
The sheer number of ingredients in this mix makes it less viable for many of the food allergy families that visit here. Those who are gluten-free and dairy-free and/or vegan may find it a great choice for a hearty bread. It is lower in sugar and higher in fiber than most bread mixes.
 The only add-in item I needed to adapt was the eggs; I used ½ cup flaxseed gel instead. The other added ingredients are water, oil, and apple cider vinegar. If you decide to try it, watch your timer; my bread was done at 45 minutes (compared to the 60 to 65 minutes the package suggests it needs).
The bread is on the dense side but still very easy to slice. You can see it pictured here with homemade blackberry jam – a healthy start to the day!
I have also tried it with salami from Applegate Farms, sliced avocado, and homemade mustard. That was a very tasty sandwich!
I prefer the Homemade Wonderful Bread Mix to this one, as I found it to be more of an all-around bread and more likely to suitable for different dietary restrictions. If you try them, let me know what you think!
Monday, June 10, 2013
Back from BlogHer Food

After two days of conference programming, meeting bloggers, checking out new products, and making new friends, I am exhausted. (Not to mention the day of travel it took me to get there and another day to get back.)
But I miss everyone… it’s so much fun to be with people who want to talk about food and especially other people with food restrictions (there were a surprising lot of us there) who want to talk about food. That’s just one of the reasons I am looking forward to The Food Allergy Blogger Conference in November.
I have now attended three BlogHer conferences and two BlogHer Food conferences. Between you and me, BlogHer Food is my favorite. It’s big, but not too big. The pace is fast, but not too fast. The sessions are all about topics I want to talk about, and it’s just the right level of exhausting.
And then there’s the food. We were in Austin, a city that proved itself to be very food-allergy friendly. My favorite meal of the weekend was at a dinner hosted by Udi’s Gluten-Free at Second Bar and Kitchen. They made a fabulous fish dish with garbanzo beans:

A close second was the melt-in-your-mouth dinner at the closing party at Stubb’s Barbeque. Somehow I managed to forget to take a picture of my meal at Stubb's. I must have been hungry.
There was a lot of hype prior to the event about food trucks. I was intrigued. I’m not sure what I was expecting, but I discovered food trucks to be not much more than ice cream trucks or hot dog stands.

Maybe it was because of all the hype, but I was disappointed. I’ll take New York street carts over an Austin food truck any day (sorry Austin).
The best part about a food conference is that every sponsor and every vendor exhibiting cares about food! There were some fabulous prizes given away; I didn’t win (I really wanted one of those Kitchen Aid prizes), but there were plenty of great things to take home and I managed to keep my suitcase under the weight limit. Here are a few of my favorites:
Udi’s Gluten Free rocked the house with products that were right up my alley:

Thank goodness Udi’s was there on Saturday morning – with skimpy gluten-free options for the conference breakfast, Udi’s fed me lemon muffins and dark chocolate brownie mini-muffins. The chocolate brownie bites are hands down my favorite.
Bob’s Red Mill was there demo-ing their whole grain line. At one of the breaks they were serving a savory Sorghum Curry. This was a sample I took home:

A great surprise was discovering Pompeian oils. I am looking forward to trying their grapeseed oil in baking projects, and the Mediterranean blend for cooking. The blend includes canola, olive, and grapeseed oils.

I was thrilled to meet the folks from Wholesome Sweeteners; I now use their organic sugars and sweeteners almost exclusively. Here’s what I took home to bake with:

Their line of flavored agave sweeteners is absolutely wonderful! Agave vanilla is my favorite.
Note to self: I must get better about taking pictures of the food I eat.

Thursday, June 6, 2013
A Busy Month
I’m about to get on a plane for Austin to attend BlogHer Food. While there, I’ll be speaking on a panel about food photography with Melissa Skorpil and Katie Jasiewicz. The name of our session is “How to Fake Great Photos.” Seems very appropriate, and it should be loads of fun. If you are in Austin please stop by!
When I get back I’ll be prepping for a local class that I am co-teaching with two other fabulous women, Alyson Chugerman and Colleen Ashe. On Saturday June 15th we’ll be teaching “Your Allergy Free Home and Kitchen,” with both food demos and a discussion on organizing your pantry.
On June 19th I’ll be at the Mid-Hudson Civic in Poughkeepsie signing books from 7:30-9:30am. This Breakfast of Champions event is hosted by the Poughkeepsie Chamber of Commerce.
Also on June 19th, I’ll be presenting a Kids with Food Allergies webinar titled, How to Bake a Perfect Cake. I’ll be doing a virtual demo and answering your questions. Sign up here.
And last but not least, On June 28th and 29th I’ll be in Philly for APFED’s annual conference. I’ll be speaking on Friday – my session is titled “Cooking Solutions for Restricted Diets.” I’ll also be signing books on Friday and Saturday.
Whew! I think that’s enough to keep a girl busy. If you plan to be at any of these events please let me know so we can connect.
Monday, June 3, 2013
Five Things I’ve Discovered Since I Wrote the Book
My grandmother used to say; “You learn something new every day.” That wisdom comes back to me often, especially when I do learn something new.
I’m more likely to learn something new when I do the same thing over and over again – as I often do in my kitchen. While I am trying to create repeatable processes and methods is when I often stumble on the greatest insights and new learnings.
Today I’d like to share a few of the things I’ve learned since I wrote Learning to Bake Allergen-Free:
1. It’s easier to roll out a crust between parchment paper than between two sheets of waxed paper. Continue to use the waxed paper if you prefer, but for me, parchment paper rules!
2. Organic evaporated cane juice works just like any other granulated sugar – and it’s less processed. Go ahead and substitute it cup for cup in any of my recipes that call for granulated cane sugar. It works great when creaming too!
3. You need a bit more guar gum per cup of flour than xanthan gum. In all of my recipes in the book I used xanthan gum – usually ¼ teaspoon per cup of flour. Having now done extensive tests with guar gum, I can tell you that a) it works, and b) you need about ½ teaspoon of guar gum per cup of flour.
4. Not all flours and not all flour blends are created equal. In fairness, I knew this when I wrote the book – I believe I even mention it in the book. Nevertheless, as I experiment with new flours and flour blends, I learn (again and again) that some are just higher quality than others. That quality is in both the texture and taste. If you find that your baked goods aren’t turning out as nicely as you’d like, try a different flour blend.
5. Arrowroot flour (starch) rocks! (Like tapioca, this is sometimes called starch and sometimes flour – same thing.) I am actually becoming a bit of an arrowroot starch snob. I have been doing side-by-side tests of the same baked goods using different starches, and in my opinion arrowroot always wins with a smoother crumb and consistent performance. So go ahead and mix that gluten-free flour blend with arrowroot next time – I think you’ll like it!
What have you learned today?
Subscribe to:
Posts (Atom)