Now that the bulk of the holiday frenzy has died down, it’s time to give back. There are still a few days left to make a donation to your favorite food allergy charity before the end of the year.
If you’re looking for inspiration, here are a few non-profit organizations and causes you might consider:
KFA (Kids with Food Allergies Foundation): This organization is one I am very close to as a member of the Board of Directors. KFA’s mission is focused on helping families manage food allergies, education, and keeping children safe. You can get double bang for you buck by donating here, as the board of directors has pledged to match donations between now and the end of the year.
APFED (American Partnership for Eosinophilic Disorders) is focused on helping families with EE/EoE and other eosinophilic gastrointestinal disorders, as well as research.
FARE (Food Allergy Research and Education): This organization formed by the merger between FAAN (Food Allergy and Anaphylaxis Network) and FAI (Food Allergy Initiative) has announced that it will focus on research and education as its primary mission.
Heroes for Life at Lurie’s Children’s Hospital: Donations to this cause will help fund food allergy research. And with a donation of $250 or more you may be eligible to receive a signed copy of my book.
Whether or not you are able to contribute to any of these fabulous causes, your participation in this community is appreciated.

Thursday, December 27, 2012
Monday, December 24, 2012
Merry Christmas!
Have a fabulous holiday!

If you are in need of (very) last minute gift ideas, or holiday hostess gifts, check out my selection of artisan holiday gift ideas for gluten-free and food-allergic foodies.

If you are in need of (very) last minute gift ideas, or holiday hostess gifts, check out my selection of artisan holiday gift ideas for gluten-free and food-allergic foodies.
Thursday, December 20, 2012
Holiday Gift Idea – Vanilla Extract Results
It’s been a fun month of artisan and homemade gift ideas for vegan, gluten-free, and food-allergic foodies. I started this series by attempting to make my own vanilla extract, and promised that I would report on the results. I am pleased to tell you that the experiment worked!

This may be the simplest food gift I’ve ever made. The recipe is as easy as placing whole vanilla beans in vodka, shaking it up every now and then, and letting it sit for 5-6 weeks. When I started on November 7th, my project looked like this:

In just a few days (on November 13th) I could see the vanilla seeping out of the beans:

By November 27th (about 3 weeks) you can see that it was a nice deep color and it was taking on that sweet vanilla smell:

On December 17th (about 5 ½ weeks) (see the picture at the top of this post), I decided it was ready to bottle:

It was a lot of fun to watch the color of the liquid change over time. This would make a fabulous science fair project!
My next version of this experiment will use bourbon. Vodka was a good choice of alcohol because it starts clear – making it very easy to see the depth of color change over time, but it doesn’t provide the same rich flavor that vanilla made from bourbon does.
Important note: Make sure you check what grains are used in the making of the alcohol you use. Many alcohols are made from wheat.
Monday, December 17, 2012
A Weighty Topic

Weight matters. The weight of your flour, that is.
Today I am going to share the single most important thing you need to know when baking with gluten-free flours. Even if you are baking without eggs and dairy (as I always do) the amount of flour you use is the one thing you must get right. It doesn’t matter whether you are using a rice-based blend, a multi-grain blend, or some other combination of flours, if you use too much flour (by weight) your baking project will fail.
I frequently get asked about recipes (mine as well as others) and why a particular baking project failed. The symptoms are usually things like:
- My muffins (bread/cake) fell flat after baking.
- My baked goods are too heavy.
- My baked goods are too dry.
So what’s the secret to success?
Most recipes (including mine) will call for flour measured in terms of cups. When you are baking with wheat, a volume measurement for wheat works just fine; most wheat flours weigh between 120 and 124 grams per cup. There isn’t enough variation between flours to make a difference.
Gluten-free flour blends, on the other hand, vary tremendously in weight. The flour blends I use weigh between 120 and 160 grams per cup. Individual gluten-free flours (single grain) weigh between 110 and upwards of 160 grams per cup.
If you are modifying a recipe that calls for 2 cups of wheat flour and replace it with a rice-based gluten-free flour blend that weighs 160 grams per cup, you will be using 60 grams more flour than the recipe requires. You won’t be happy with the result.
So what’s a baker to do?
The trick is to adjust the amount of flour you use, based on weight. In the example above, instead of 2 cups of flour, you should use 1 ½ cups. Yes, there’s that much difference.
I know what you’re thinking – it doesn’t feel right. Trust me, I’ve done this experiment many times. The answer is simple – measure flour by weight, not by volume.
Yes, it’s math, but you don’t have to be a math whiz to be a great allergen-free baker. You have two choices:
Option 1: First you need to know how much flour the recipe really requires. For example, all of my recipes in Learning to Bake Allergen-Free are measured to 128-130 grams per cup of flour. That’s my preference because I like to use the lighter whole grain gluten-free flours. If you were able to use wheat in one of my recipes, you should add one tablespoon of flour per cup that the recipe calls for. (This is because wheat flour weighs less than 128 grams.) If you choose to use a flour blend such as King Arthur Flour Gluten-Free Multi-Purpose Blend (in the blue and white box), which weighs 160 grams per cup, then you must reduce the amount of flour you use by 3 tablespoons per cup. For a recipe that calls for 2 cups of flour, you will take away 6 tablespoons after measuring 2 cups.
In my book, I include a table that describes how to make these important adjustments for some of my favorite off-the-shelf blends.
Option 2: Use a scale. This is the easy method. Again, you need to know how much flour the recipe calls for (by weight) and then simply measure to it. While you may not want to invest in a scale, I think you’ll find it saves you money in the long run, and I know you’ll be thrilled with the results. For my recipes, if you weigh to between 128 and 130 grams per cup, you’ll be in great shape!
Tip: Always measure your flour first. That way you can easily make adjustments without worrying about other ingredients in the bowl.
Have you had issues with the weight of your flour in your baking? Do you use a scale or adjust by volume?

Thursday, December 13, 2012
Holiday Gift Idea – Artisan Holiday Chocolate Truffles

It never takes arm-twisting to convince me to make something chocolate, and these are here just in time to make them for a hostess gift for a holiday party, or to serve on Christmas Eve, or alongside dessert on Christmas Day. And did you know that Santa really appreciates chocolate truffles after all those cookies? He (or ahem – she) might even prefer them!

The basic ingredients for these truffles is the same:
¼ cup coconut cream (I use So Delicious creamer – the one in the small carton that’s intended to be added to coffee)
1 ½ tbsp Earth Balance Natural Shortening (or shortening of choice)
1 cup chocolate chips (Enjoy Life mini chocolate chips is my choice)
½ tsp vanilla extract
What makes them special is what you add:
For Holiday Sprinkle Truffles you will need some festive sprinkles. Be sure to check the label for possible allergens.
For Peppermint Truffles you will need some crushed peppermint candy (either buy it crushed or crush a candy cane) and some unsweetened natural cocoa powder. Again, check the labels.

Here’s a trick – if you’re making more than one batch, make them together and separate the chocolate when you’re ready to add the special ingredients.
Half of the fun in making truffles is getting your hands dirty, and it’s a great activity to do with the kids (just make sure they wear something easily washable).
Step 1: Melt the shortening and creamer together over medium heat. Increase the heat to medium-high and stir frequently, just bringing it to a boil. Add in the chocolate chips and vanilla and whisk to a smooth glossy consistency.
Step 2: Refrigerate for an hour to an hour and a half, until the mixture is hardened, but pliable. Soften it for 30 seconds in a blender, if needed.
I’m always afraid that this isn’t going to work, that the mixture won’t harden, and I am amazed when it works every time!
Step 3: If you need to add in ingredients, add them now. For the Peppermint Truffles, this is where you add in the peppermint bits (1/4 cup for the full recipe). For the Holiday Sprinkle Truffles, there is nothing to add here.
Step 4: Roll the truffles with your hands. Use cool dry hands. You can make the truffles as big or as small as you want. Scoop them out first, then roll. Use just your palms with very light pressure. Place the balls on a sheet of parchment.

Step 5: Decorate!
For the Holiday Sprinkle Truffles: Place the spinkles in a shallow dish. Roll the truffles in the sprinkles to coat the exterior. You may need to gently press the sprinkles into the truffles to get them to stick.

For the Peppermint Truffles: The peppermint bits are already inside. Place ¼ cup of cocoa in a shallow dish, and roll the truffles in the cocoa to coat.
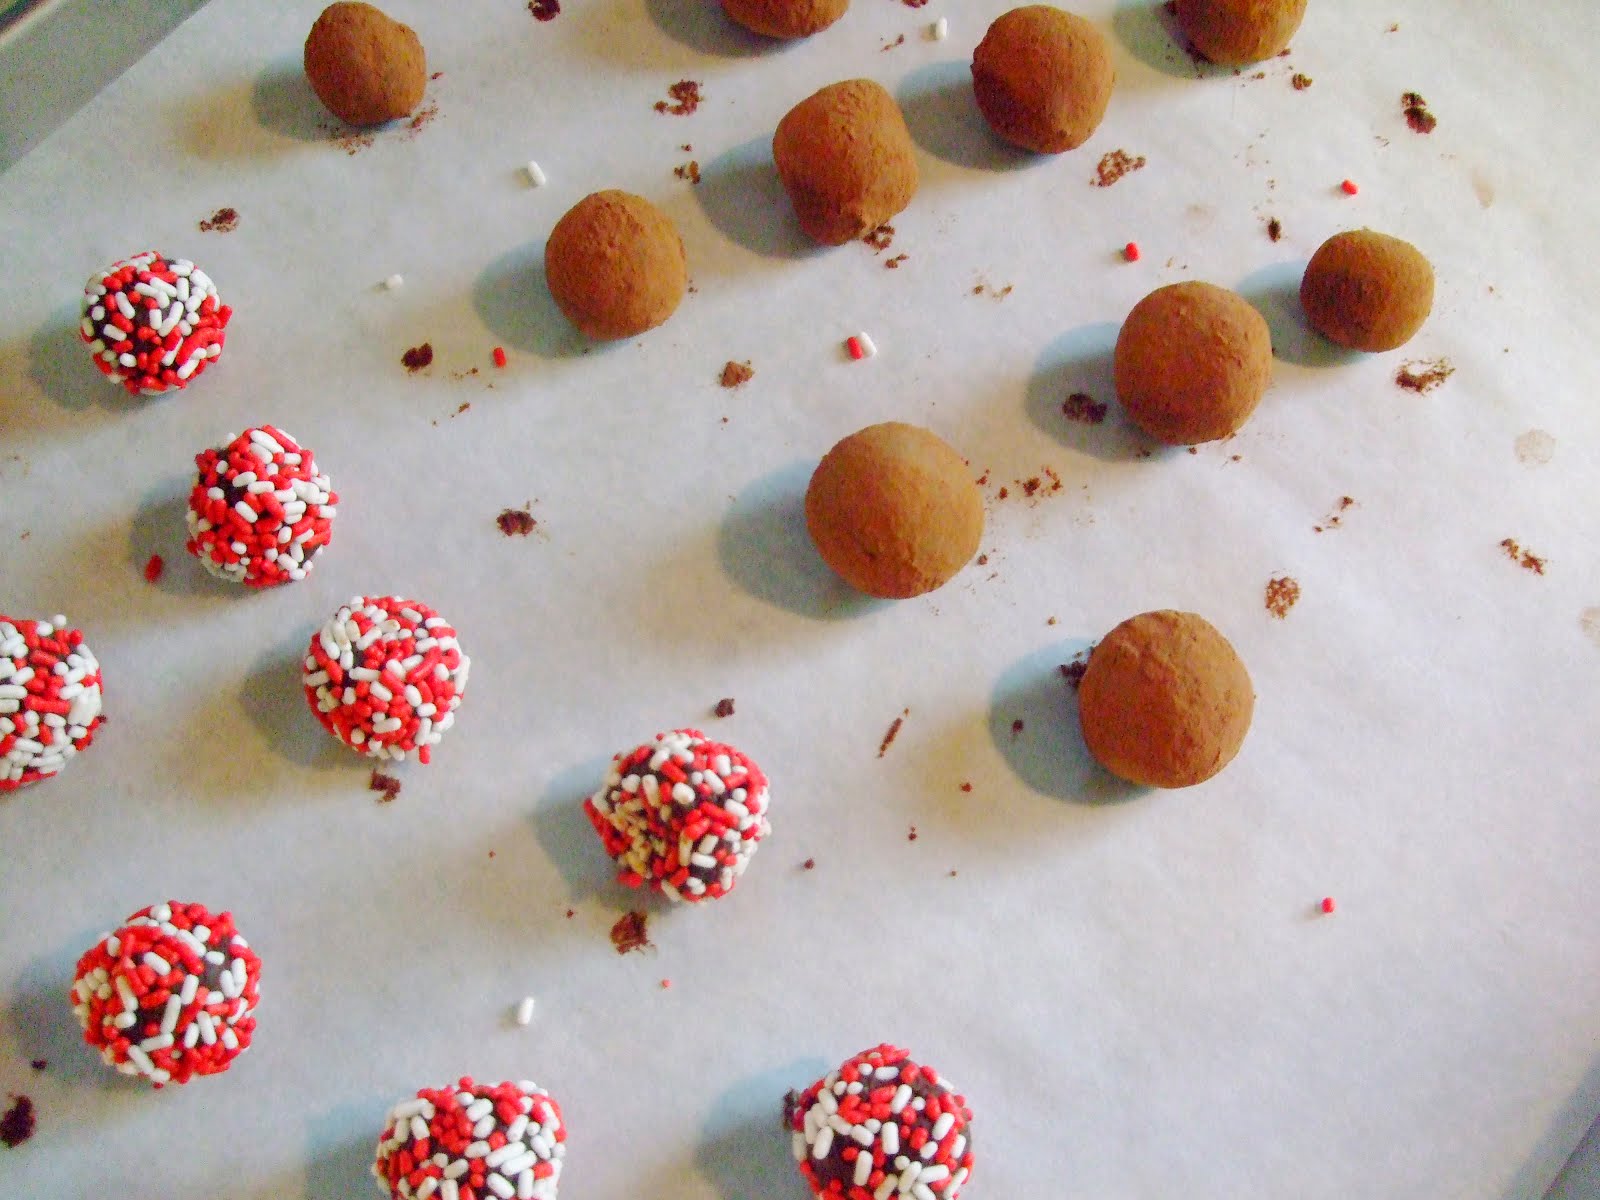
While the Sprinkle Truffles look pretty, I have a definite preference for the peppermint truffles:

Monday, December 10, 2012
Make Your Own Food Coloring

I avoid buying anything with food coloring in it, and I absolutely refuse to add anything to my food that isn’t – well, food. Who needs ingredients like FD&C Yellow 5, or FD&C Blue 1, or FD&C Red 40 in their food? Not I, and you may not want it either.
But without some kind of coloring, frosting a cake can become a bit blah. My solution? Use real food to color the frosting. Melted chocolate will make for a nice brown decoration, but my favorite ingredient to use to color food is fruit.
Here I used cranberries to color my white frosting pink. I used a small mashing tool to squeeze the juice out of about a dozen cranberries, and then added one tablespoon of the juice to my frosting. More juice would result in a deeper color, less juice would give a lighter hue.

I used the leftovers from a cake decorating project to decorate some Baked Doughnuts from Learning to Bake Allergen-Free: A Crash Course for Busy Parents on Baking without Wheat, Gluten, Dairy, Eggs, Soy or Nuts

Another great option for a natural red food coloring is pomegranate seeds. As you remove the seeds from the pomegranate, take advantage of the juice. What do you use for food coloring?
Thursday, December 6, 2012
Holiday Gift Idea – Dairy-Free Gluten-Free Apple Cider Candy
Last week it was chocolate chewy candy, this week I’ve got a new spin on the chewy candy for you – Apple Cider Candy.
Dairy-Free Gluten-Free Apple Cider Candy
1/2 cup powdered sugar
1 tsp cinnamon
2 cups powdered rice milk
2 tbsp agave nectar
4 tbsp boiled cider
1 teaspoon pure vanilla extract
1 tablespoon Earth Balance Natural Shortening, melted (or shortening of choice)
Combine the powdered sugar, cinnamon, and half of the powdered rice milk. Mix together well and set it aside. This will be a very powdery mix.
In a large mixing bowl, blend together the agave nectar, boiled cider, vanilla, and shortening. Add the dry ingredients and blend on low until completely combined.
Coat a smooth prep surface with a small amount of the remaining rice milk. Move the dough from the bowl to the prep surface. Work the remaining powdered milk into the candy ball with your hands, a little bit at a time. When you can no longer manipulate the ball with your hands (or you use up the remaining powdered rice milk) you are done kneading.

Place the dough ball on a sheet of wax paper and flatten it with your hands until it is a disk. Use a sharp non-stick knife to cut the dough into desired size pieces. Cut squares of wax paper and wrap the candies individually. This recipe makes about 24 pieces.
Wrap it up with a bow and you have a fabulous artisan gift for your favorite foodie!

Monday, December 3, 2012
Earth Balance Adds Flax to Their Natural Shortening Sticks
There are some things that just shouldn’t change. I hate it when my favorite bra is discontinued, or the formula for the moisturizer that I use for my sensitive skin changes. When food ingredients change – and they do – I get even more distressed.
Most recently, Earth Balance has changed the formula for their natural shortening sticks. These are the ones that come in the green and light yellow box, and work marvelously as a replacement for butter when baking. Until now, the sticks were a blend of palm fruit, canola, soybean, and olive oils – all non-GMO. Now, they have added flax oil to the mix.
This means that the parents of kids with allergies to flax or other seeds may no longer be able to use this as their shortening. I say “may” because the product consists of oils – fats – rather than proteins; most allergies are to the protein in food, and oils are usually refined well enough that no protein remains. However, seeds are tricky things, and anyone with a flax or seed allergy will want to check with their doctor before continuing to use this product.

That said, when I called Earth Balance to check on the ingredients, they were very excited about the change, noting that the addition of flax means greater nutrition in the form of Omega-3 fatty acid, and for many of us that is a good thing. It is also a good thing that the product continues with all non-GMO ingredients – including the canola oil.
I can also tell you that the new formula works equally well as the prior version when baking, and remains a favorite of mine for replacing butter. If flax is not a concern for your family, you will want to continue to use it too. However, this is a great reminder that ingredients change, and you must always check the labels – every time.
Thursday, November 29, 2012
Holiday Gift Idea - Allergen-Free Chocolate Chewy Candy

Allergen-Free Chocolate Chewy Candy (Gluten-Free, Dairy-Free)
½ cup honey
1 teaspoon pure vanilla extract
1 tablespoon Earth Balance Natural Shortening, melted
¼ cup plus 2 tablespoons unsweetened cocoa powder
¼ cup powdered sugar
1 cup powdered rice milk
Combine the cocoa, powdered sugar, and half of the powdered rice milk. Mix together well and set it aside. This will be a very powdery mix.

In a large mixing bowl, blend together the honey, shortening and vanilla. Add the dry ingredients and blend on low until completely combined.

Coat a smooth prep surface with a small amount of the remaining rice milk. Move the dough from the bowl to the prep surface.

Work the remaining powdered milk into the candy ball with your hands, a little bit at a time. When you can no longer manipulate the ball with your hands (or you use up the remaining powdered rice milk) you are done kneading. Place the dough ball on a sheet of wax paper and flatten it with your hands until it is a disk.

Use a sharp non-stick knife to cut the dough into tootsie-roll-sized pieces.

Cut squares of wax paper and wrap the candies individually. This recipe makes about 24 pieces.

I was really thrilled with the result. This is a dead ringer for “the real thing.” Bring this as a hostess gift, fill a stocking, or give it to your favorite gluten-free and allergen-free guest!

Monday, November 26, 2012
Label Confusion
I recently came across a candy product that had the ingredients labeled this way:
Ingredients: milkfat, soy lecithin, milk (among a long list of other ingredients)
Allergy information: May contain tree nuts
Is this labeled correctly according FDA rules? Yes, it is.
Is this confusing? Yes, it is.
This product actually contains milk and soy (although the soy may just be fats and not proteins). The product is not intended to include nuts of any kind, but is either processed on equipment that also processes nuts (likely, given that this was a candy product) or in a facility that processes nuts.
The labeling laws require that the top eight food allergens be listed using the common name (in this case milk and soy) either in the ingredients list, or called out below the ingredients list. In this case the manufacturer used the common terms in the ingredient list, thereby complying with the law. The allergen statement below the ingredients list is voluntary, and in this case was used to alert the consumer of the potential for contamination with tree nuts.
If you were in a hurry and checked only the voluntary “allergen information” statement, you may unintentionally purchase (and/or eat) a product that contains your food allergen.
This is why you must always read the entire ingredients label. And this is why we need more clarity in food allergen labeling laws.
Friday, November 23, 2012
Get Free Shipping on a Signed Book
Happy Black Friday! And I hope you all had a wonderful (and uneventful) Thanksgiving with fabulous allergen-free food!
If (like me) you are opting to stay home on Black Friday and doing some shopping online, I have a special deal for you on Learning to Bake Allergen-Free.
I am offering the book for a discounted price of $18, and I’ll pick up the shipping cost. I will sign and ship the book to whomever you choose in the Continental US, for no additional cost. This offer ends Dec 12th (to ensure arrival by Christmas). If you are interested in purchasing a book, please click here to e-mail me. Payment is via paypal only.
Don’t you just love giving personalized books as gifts? This is your chance to get a signed copy as a gift for your favorite family with food allergies, or even to pick one up for yourself!
Monday, November 19, 2012
Buckwheat Turkey Stuffing – Gluten-Free
One of the pleasures of my childhood Thanksgivings was the meat stuffing. While everyone else was making bread stuffing (often from a box), my mother always made meat stuffing from a recipe handed down for generations from my French Canadian ancestors. When it was time for seconds, the stuffing was what I went for first.
Over the years the all-meat stuffing was transformed to become a meat and bread stuffing. In prior years I have replaced the bread with rice and other grains. This year, I have transformed the recipe once again to take advantage of one of my favorite grains – buckwheat.
Buckwheat Turkey Stuffing
2 cups buckwheat, cooked
2 pounds ground turkey (ground beef or ground pork may be substituted)
2 tablespoons Goya Adobo seasoning
2 tbsp olive oil
4 cloves garlic, minced
2 large onions, diced
Prepare the buckwheat according to package directions. While this is cooking, brown the turkey in a large skillet. Mix in the seasoning.
In a separate pan, heat the olive oil. Add the garlic and onions and sauté until the onions are lightly browned.
Mix all ingredients together in a large mixing bowl. Let it cool before stuffing the turkey.
Have a great holiday!
Over the years the all-meat stuffing was transformed to become a meat and bread stuffing. In prior years I have replaced the bread with rice and other grains. This year, I have transformed the recipe once again to take advantage of one of my favorite grains – buckwheat.

Buckwheat Turkey Stuffing
2 cups buckwheat, cooked
2 pounds ground turkey (ground beef or ground pork may be substituted)
2 tablespoons Goya Adobo seasoning
2 tbsp olive oil
4 cloves garlic, minced
2 large onions, diced
Prepare the buckwheat according to package directions. While this is cooking, brown the turkey in a large skillet. Mix in the seasoning.
In a separate pan, heat the olive oil. Add the garlic and onions and sauté until the onions are lightly browned.
Mix all ingredients together in a large mixing bowl. Let it cool before stuffing the turkey.
Have a great holiday!
Thursday, November 15, 2012
Holiday Gift Idea – Make Your Own Vanilla Extract

The ingredients are simple – vanilla beans and vodka (or another alcoholic beverage, such as bourbon). You will need a glass container to make it in – I chose one with a wide mouth so I could easily add or take away vanilla beans as needed.

My research told me that I should use about 2-3 beans per cup of vodka. I used 1 ½ cups of vodka, so 4 beans sounded right.
Finding vanilla beans may be the hardest part of this experiment. I ordered mine from amazon at a really terrific price.
The best part about having vanilla beans in the house is the smell. Vanilla smells sooooo good, and so will your fingers after you score the beans – the next step in this process. I also cut off the tips so they would fit in my jar. I’ll use those in another project.

My research also told me that it takes about 4-6 weeks for the vanilla extract to be ready to use. My goal is to have it ready for gifts for Christmas. Between now and then I’ll take pictures so I can show you how it came out. Meanwhile, here’s how it looks now:

Don’t worry, I’ll save some for myself too so I can keep creating new recipes!
Monday, November 12, 2012
Pamela’s Gluten-Free Artisan Flour Blend
It can’t be just me. When I find a new market – especially one that has lots of whole foods that are gluten-free and allergen-free, I get excited. I’m like a kid on a treasure hunt, and I can spend more than an appropriate amount of time scouring the shelves (and reading labels) while my husband rolls his eyes and wanders off in search of a cup of tea.
A couple weeks ago, while at Guido’s Fresh Marketplace in Western Massachusetts sharing samples and signing books, I spied a new product that I just had to try – Pamela’s Artisan Flour Blend. This was the kind of store I could get lost in, but I was busy busy busy talking to customers and sharing tips. So while I was working, my husband bought me a couple packages, proof that a) he was paying attention, and b) that he really does appreciate what I bake!

This new flour blend is unlike any other in many respects. First, the ingredients: brown rice flour, tapioca starch, white rice flour, potato starch, sorghum flour, arrowroot starch, sweet rice flour, and guar gum.
Unlike the typical “white” gluten-free blend, this blend adds sorghum flour and arrowroot starch (two of my favorites when baking). Its nutrition profile is very similar to other gluten-free “white” flours (mostly carbs) with the addition of a bit of fiber.
One very important difference between this and other off-the-shelf flour blends is the use of guar gum rather than xanthan gum. Both products provide a similar effect in gluten-free baked goods (they help hold things together), but this is the first blend I’ve found that uses guar gum. There are some who claim that xanthan gum can cause gastro-intestinal distress, and there are others who claim guar gum does so. If – for whatever reason – you need to avoid xanthan gum, this may be a great choice for you.
However, the single most important difference between this flour and most other off-the-shelf gluten-free flour blends is the weight of the flour. In Learning to Bake Allergen-Free , I discuss in detail the difference the weight of your flour can make. The super-short version is: Most wheat flours weigh less than gluten-free flours, and adjustment is required if you want your baked goods to fluff properly.
Pamela’s Artisan Flour Blend weighs in at 120 grams per cup. Most wheat flours weigh between 120 and 124 grams per cup. This means that you can actually use this flour blend 1-1 (cup for cup) to replace wheat. I use the word "actually" here, because while many gluten-free flour blends claim to be able to do this, I find that most require some adjustment. If you have a favorite recipe you are trying to make gluten-free, no adjustment is required on the weight of the flour when you use this blend.
If you use this blend with any of my recipes here or in Learning to Bake Allergen-Free (which are designed at 128-132 grams per cup), the adjustment is simple: add 1 tablespoon per cup of flour.
Of course, the most important test is how well it performs and how good it tastes. The best way to test is with tried and true recipes. First I made Banana Muffins, using the Banana Bread recipe in Learning to Bake Allergen-Free, and I added chocolate chips (because I’m that kind of girl).

These were absolutely delicious! The flour even browned nicely, and they were perfect for the next few days.
Next I tried a staple: Basic Sandwich Bread from Learning to Bake Allergen-Free.

Because the blend held together so well, I was able to slice this bread very thin, and it tasted absolutely great!
This is a flour blend that I will definitely keep stocked in my pantry and will add to my “recommended” flours list.
Please note: While the product is not intended to contain dairy, eggs, nuts, or soy, the warning label notes that this product is processed on equipment that also processes tree nuts, soy, eggs, and milk. Please choose this one only if it’s appropriate for your family.
A couple weeks ago, while at Guido’s Fresh Marketplace in Western Massachusetts sharing samples and signing books, I spied a new product that I just had to try – Pamela’s Artisan Flour Blend. This was the kind of store I could get lost in, but I was busy busy busy talking to customers and sharing tips. So while I was working, my husband bought me a couple packages, proof that a) he was paying attention, and b) that he really does appreciate what I bake!

This new flour blend is unlike any other in many respects. First, the ingredients: brown rice flour, tapioca starch, white rice flour, potato starch, sorghum flour, arrowroot starch, sweet rice flour, and guar gum.
Unlike the typical “white” gluten-free blend, this blend adds sorghum flour and arrowroot starch (two of my favorites when baking). Its nutrition profile is very similar to other gluten-free “white” flours (mostly carbs) with the addition of a bit of fiber.
One very important difference between this and other off-the-shelf flour blends is the use of guar gum rather than xanthan gum. Both products provide a similar effect in gluten-free baked goods (they help hold things together), but this is the first blend I’ve found that uses guar gum. There are some who claim that xanthan gum can cause gastro-intestinal distress, and there are others who claim guar gum does so. If – for whatever reason – you need to avoid xanthan gum, this may be a great choice for you.
However, the single most important difference between this flour and most other off-the-shelf gluten-free flour blends is the weight of the flour. In Learning to Bake Allergen-Free
Pamela’s Artisan Flour Blend weighs in at 120 grams per cup. Most wheat flours weigh between 120 and 124 grams per cup. This means that you can actually use this flour blend 1-1 (cup for cup) to replace wheat. I use the word "actually" here, because while many gluten-free flour blends claim to be able to do this, I find that most require some adjustment. If you have a favorite recipe you are trying to make gluten-free, no adjustment is required on the weight of the flour when you use this blend.
If you use this blend with any of my recipes here or in Learning to Bake Allergen-Free (which are designed at 128-132 grams per cup), the adjustment is simple: add 1 tablespoon per cup of flour.
Of course, the most important test is how well it performs and how good it tastes. The best way to test is with tried and true recipes. First I made Banana Muffins, using the Banana Bread recipe in Learning to Bake Allergen-Free

These were absolutely delicious! The flour even browned nicely, and they were perfect for the next few days.
Next I tried a staple: Basic Sandwich Bread from Learning to Bake Allergen-Free.

Because the blend held together so well, I was able to slice this bread very thin, and it tasted absolutely great!
This is a flour blend that I will definitely keep stocked in my pantry and will add to my “recommended” flours list.
Please note: While the product is not intended to contain dairy, eggs, nuts, or soy, the warning label notes that this product is processed on equipment that also processes tree nuts, soy, eggs, and milk. Please choose this one only if it’s appropriate for your family.
Thursday, November 8, 2012
Holiday Gift Idea – Figgy Pear Jam
I’ve been on a make-it-yourself kick this year. I’ve been making candy and salad dressings, and sunflower butter, and lately – jam, lots and lots of jam. What to do with all these great foods? Why give them as gifts, of course… but first I had to make some more jam. Why? Because I found some figs.
I can only find figs in my local grocery store or a couple of months in the year – and even then, they seem to disappear quickly. I decided to pair the figs with pears, and came up with a luscious gluten-free and allergen-free jam that would make a great hostess gift or teacher gift. Or serve it instead of (or in addition to) cranberry sauce.
Figgy Pear Jam
2 cups figs, chopped (about 6-8 figs)
2 cups pears, peeled and diced (about 2 pears)
1 2/3 cups of sugar
½ tsp vanilla bean paste (or 1 tsp vanilla extract)
1 tbsp lemon juice
Combine the chopped figs and pears with the sugar and vanilla in a medium-large non-reactive (stainless steel works wonderfully), and let it sit for 30 minutes to an hour. The sugar will start to liquefy.

Boil on medium heat, stirring frequently, for about 15 minutes until the pears start to get mushy. Use a potato masher to break up chunks of pears and figs. You can make this very smooth or keep it chunky – whatever you prefer.
Add the lemon juice and boil for another 5 to 10 minutes until the jam is thickened.

If you want to preserve the jam (as I did), you should have the jams jars boiling while you make the jam. Boil the filled jam jars for 10 minutes. Otherwise, store the jam in the refrigerator or freeze in an airtight container.

This recipe makes about 2 ½ cups of jam – enough for a gift and to keep some for you! Yum!
Monday, November 5, 2012
Food Allergy Sites that Contribute to Safer Eating
I don’t always like surprises. For example, I hate it when I discover that one of my favorite foods has changed and now contains an ingredient we can’t eat (a post on that topic coming soon). But there are also good surprises – unexpected recognition belongs on that list!
Last week (in the midst of the storm) I learned that this site had been chosen as one of 25 food allergy sites “that really contribute to safer eating.” No weeks of voting, no feeling like I was running for homecoming queen, simply hand-picked by the experts at KwikMed.

Looking at the “winners,” I once again find myself in great company. Nearly all of my favorite food allergy blogs are on this list. Congratulations to all of the winners!
Wednesday, October 31, 2012
Spiders, and Worms, and Bears, Oh My!
It seems that the Northeast just can’t catch a break on Halloween. Last year it was a blizzard that brought down tree limbs and power lines. This year it’s Hurricane Sandy.
Despite the grim forecasts for my area, we were very fortunate most of the storm’s wrath. We still have power, and (unlike last year) tree limbs appear to be mostly where they should be (on the trees). Of course that means we will have trick-or-treaters tonight and I haven’t had a chance to get to the store, but I do have these fabulous treats that the folks at Surf Sweets sent me to try:

Aren’t those Spooky Spiders just the cutest thing you’ve ever seen? But wait – the best part is these sweets are safe for most with food allergies. While the specific ingredients vary for the different products, they are all gluten-free, dairy-free, nut-free, soy-free, and egg-free. They are made with only natural, non-GMO ingredients. They are, of course, full of sugar (natural sugars only), but it’s Halloween and if you can’t have sugar on Halloween, then when can you?
If, like me, you don’t yet have a stash of Halloween candy, this is a great option. It’s also a fabulous choice to have on hand to swap for the stuff the kiddos can’t eat when they get home from trick-or-treating.
What are you handing out to the trick-or-treaters tonight?
Monday, October 29, 2012
More Obsessions – Jacob's Jam
I’ve mentioned my recent obsession with jam.
I have also been obsessed with a fellow blogger’s challenge to feed her son. Jenny, who blogs at Multiple Food Allergy Help, has been struggling with a severely limited list of foods her son can eat. Like my son, he suffers from EE, but he reacts to many more foods – and there is nothing that tugs at my heartstrings more than a child who lists the only ten foods he can eat, when asked what he is allergic to.
Jenny just recently made the decision to put her son on a feeding tube, but he can still have a very short list of foods – and that list includes cranberry and pear. So, guess what I made?
Jacob's Jam (Cranberry-Pear Jam)
1 ½ cups cranberries (whole)
2 cups pears, peeled and diced (2 medium pears)
1 ¾ cups sugar
2 tbsp water
½ tsp vanilla (optional)
Combine the cranberries, pears, and sugar in a large non-reactive saucepan:

Let it sit for about 30 minutes until the sugar starts to liquefy:

Boil the mixture on medium heat in a nonreactive saucepan (stirring frequently), about 12-15 minutes until the cranberries have popped. Use a potato masher to mash the pear chunks:

Add the vanilla (if desired). Boil for another 3-5 minutes (stirring frequently) until the jam has thickened. Cool completely before serving.

Cranberries are just starting to show up in the grocery store, so this is the perfect time to make this jam. It can be made and preserved (as I am doing above), or simply made to eat right away. It will keep in the refrigerator for a couple of weeks.
Jacob can’t have any grains (which means no bread). Clearly this can be eaten alone as a bowl of fruit, but here are a couple more ideas:
Freeze it in ice cube trays with a lollipop stick, and serve it as a popsicle.
Serve it on top of a baked sweet potato (another one of his safe foods) (sounds Thanksgiving-ish, doesn’t it?)
Dip spoonfuls into melted Enjoy Life chocolate chips, and eat it off the spoon after cooling. These can be chocolate covered “lollipops.”
What else might Jenny do with the jam?
Subscribe to:
Posts (Atom)