Tuesday, December 29, 2015

Aquafaba Mayo

The new year is nearly upon us, and that means it's a great time to learn something new. With this recipe, you will not only learn how to make an emulsion (everyone should know how), you will learn how to make an emulsion using the liquid from a can of beans (also know as aquafaba).

Trust me, making an emulsion is fun. (Really.) Maybe you got a new immersion blender from Santa. If so, lucky you, you are ready to go!

Use the liquid from a can of beans to make this amazing, light, flavorful mayo! Allergy friendly, dairy-free, and egg-free. Recipe found at Learning to Eat Allergy-FreeThe method to make aquafaba mayonnaise is exactly the same as with flaxseed mayonnaise, but considerably more oil is needed when using aquafaba – about two times as with flaxseed mayonnaise. (In flaxseed mayonnaise I used two flaxseed eggs to ¾ cup oil – here I am using the equivalent of one “aquafaba egg.” And aquafaba has a citrusy flavor as is – hence just a little bit of acid is needed.
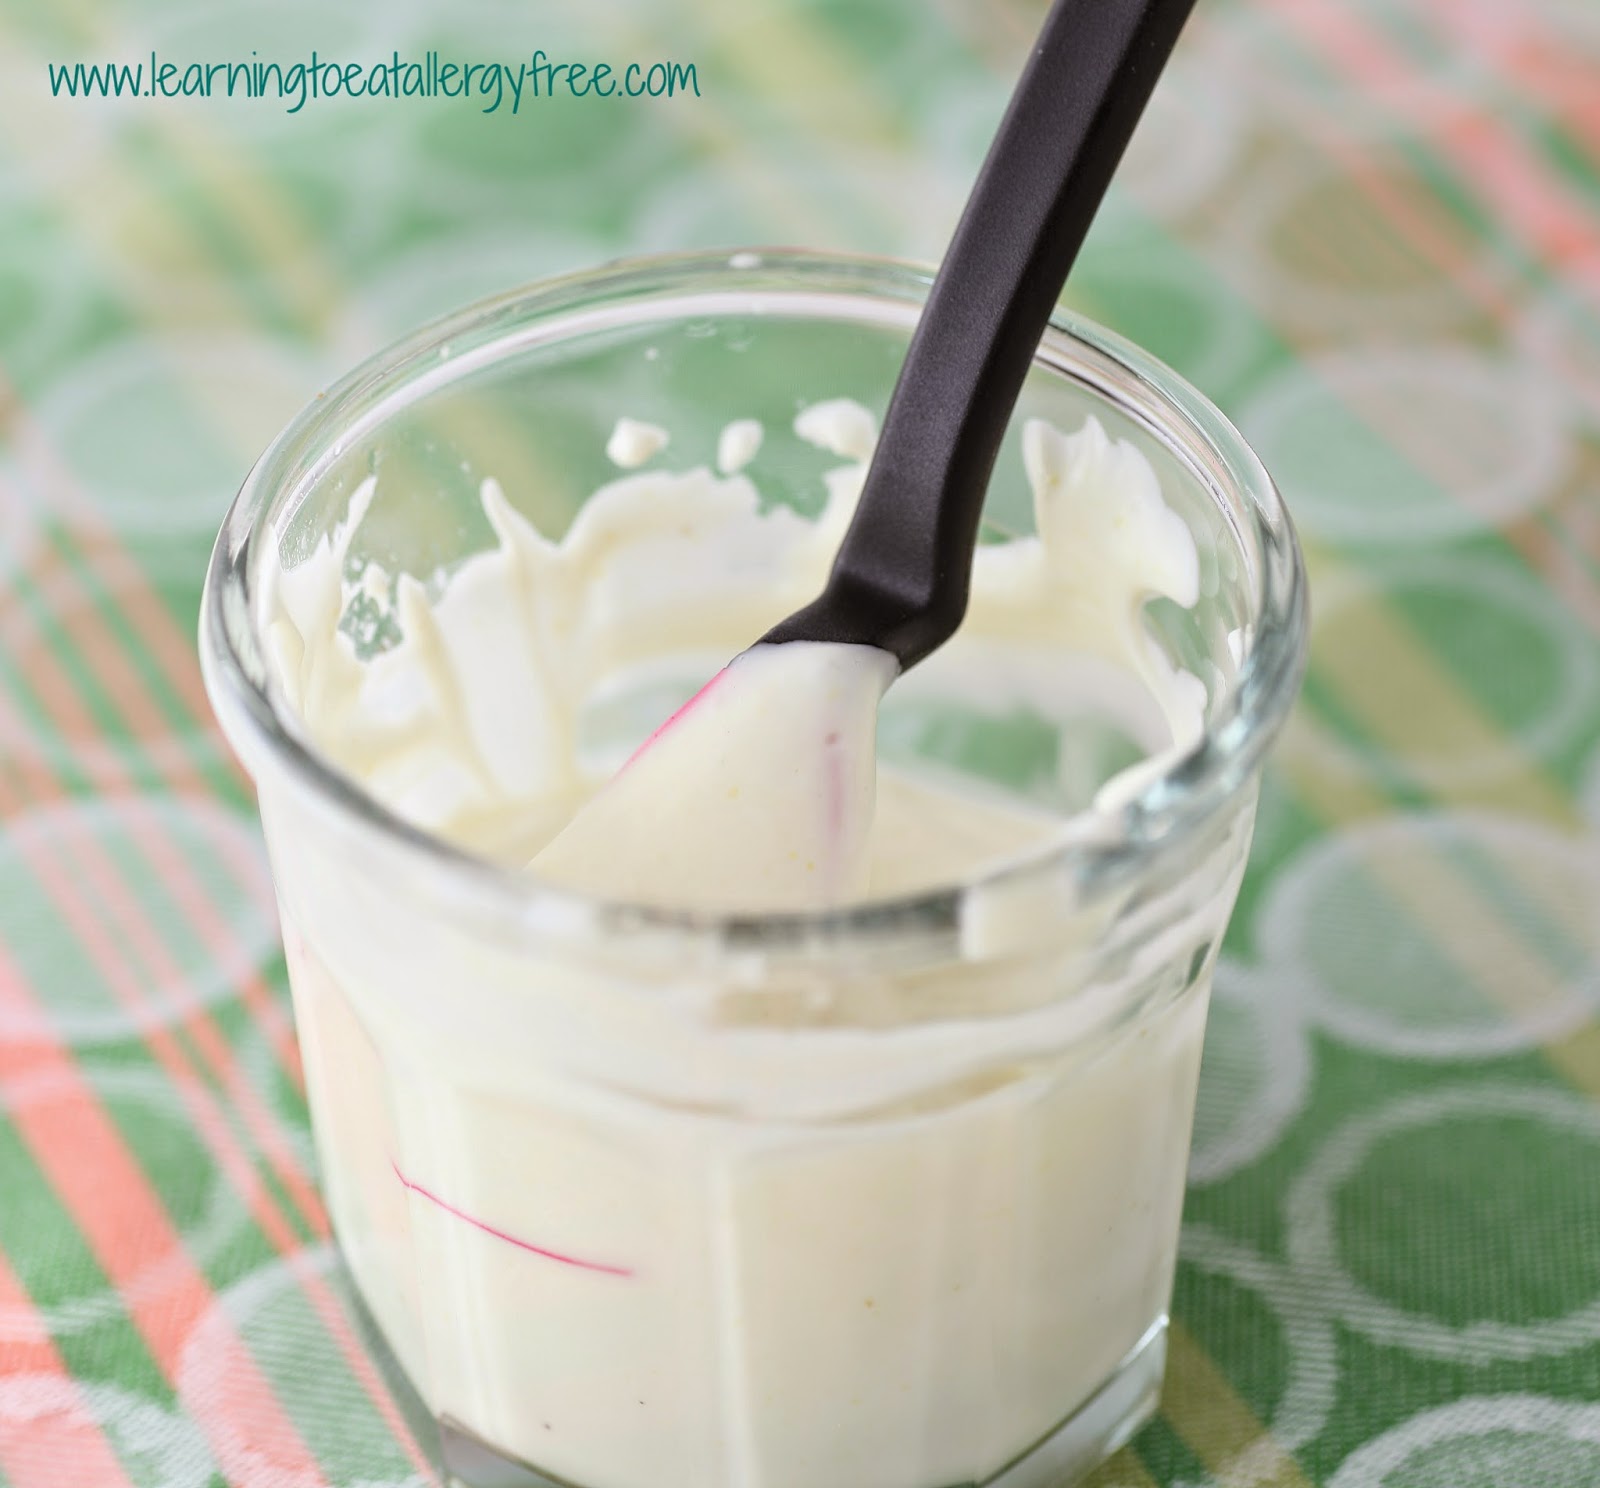
Aquafaba Mayonnaise


¼ cup aquafaba (the liquid from a can of garbanzo beans)
¼ teaspoon salt
½ teaspoon mustard
¼ teaspoon lemon juice
¾ cup oil

Combine the aquafaba, salt, mustard, and lemon juice in a working glass with an immersion blender. Add the oil in a slow trickle while continuing to run the immersion blender until all of the oil is incorporated.

Mayonnaise made from bean brine. Yes, really! It's egg-free and vegan!

Aquafaba mayo is a bit more akin to a milk mayonnaise than it is to flaxseed or traditional egg mayonnaise – it has a smoother, lighter, almost frothy consistency. I expect it will work quite well in salad dressings (it must be time for me to create something new).

Tuesday, December 22, 2015

Chocolate Croissants - Gluten-Free and Vegan

Breakfast on Christmas morning is always special in my house. After opening all those presents from Santa, my boys are hungry! These Chocolate Croissants from Learning to Bake Allergen-Free.are perfect. They can be baked a day or two ahead and warmed up when you are ready to serve them.

You might not be able to have eggs or traditional cereal with milk for breakfast, but yes, you can have chocolate for breakfast with this gluten-free, dairy-free, egg-free recipe!


The French refer to chocolate croissants as pain au chocolat. Translated literally, this means “chocolate bread,” and there’s no better place to get it than a street-side café in Paris. Unless of course you need an allergen-free version—in which case you’ll want to make your own at home.

When making a puffed pastry or croissant with traditional ingredients, it’s typical to use puff pastry dough. These are unleavened, made with multiple layers of wheat dough, and lots of butter. The technique to make this dough takes advantage of the gluten in the flour, and results in flaking when baked. Since we’re baking without gluten, my recipe uses yeast to provide some lift. It won’t be as flaky as a croissant made from wheat and butter, but it still gives you that rich, decadent experience you would expect from chocolate bread, and it’s lower in fat.


Makes 8 Croissants

1½ cups gluten-free flour blend (192 grams)
¼ teaspoon xanthan gum (leave out if your flour blend contains xanthan gum)
2¼ teaspoons quick-rising yeast
¼ cup sugar
¼ teaspoon salt
2 teaspoons baking powder
¼ cup grapeseed oil
¼ cup warm water
1½ teaspoons Ener-G Egg Replacer mixed with 2 tablespoons warm water (equal to 1 egg)
1 teaspoon vanilla extract
Up to 3 tablespoons warm water (as needed)
Up to 2 tablespoons additional flour for dusting
¾ cup allergen-free chocolate chips

1. Line a baking sheet with parchment paper.

2. Combine the flours, xanthan gum (if needed), yeast, sugar, salt, and baking powder in a medium bowl. Set it aside.

3. Blend the oil, water, egg replacer mixture, and vanilla together in a large bowl, using a mixer on medium speed, about 1 minute.

4. Slowly add the dry ingredients to the wet mixture, mixing on medium-low speed, until combined.

5. Beat for 5 minutes on medium-high speed, until the dough is pulling away from the sides of the bowl. Add up to 3 tablespoons warm water, ½ tablespoon at a time, as needed.

6. Spread a thin layer of flour on a smooth prep surface. Scoop the dough on top of the flour.

7. Use a bench knife or sharp-edged knife to divide the dough into eight equal-sized cubes.

8. Coat each portion lightly with flour.

9. Use a rolling pin to roll out each cube into a rectangle about 6 inches long and 4 inches wide. Place them on the prepared baking sheet.
10. Place chocolate chips in the center third of each rectangle, and fold the flaps over the chocolate. Place a drop of water under the top flap to help it stay in place, and tuck it under so it stays secure.

11. Proof for 35 to 45 minutes.

12. With 5 minutes left to rise, preheat the oven to 350°F.

13. Bake at 350°F for 12 to 16 minutes until the tops are lightly browned and the chocolate is bubbling around the edges.

14. Let the croissants cool completely, and then decorate with chocolate glaze:

Decorating Chocolate Croissants from Learning to Bake Allergen-Free is easy!

Tips

• Note that the temperature for baking the croissants is 350°F, lower than most yeast bread recipes. You don’t want to burn the chocolate by baking it at too high a temperature.
• Use your favorite gluten-free flour blend or ¾ cup brown rice flour, ½ cup sorghum flour, and ¼ cup tapioca starch.

Credit line: Recipe from Learning to Bake Allergen-Free: A Crash Course for Busy Parents on Baking without Wheat, Gluten, Dairy, Eggs, Soy or Nuts, copyright © Colette Martin, 2012. Reprinted by permission of the publisher, The Experiment. Available wherever books are sold.

You won't want to wait for these gluten-free Chocolate Croissants to cool, they are so yummy!

Monday, December 21, 2015

And the Winner Is...

The winner of the Gluten-Free Holiday Cookie Exchange Giveaway is:

Brianna Hobbs of Flippin' Delicious

Congratulations Brianna, this gift pack is coming your way:


Don't forget to check out all of the cookies and make your favorite for Santa!

Tuesday, December 15, 2015

Del Posto – A Restaurant Review

I don’t often post restaurant reviews. I am in the habit of dining out at the same places over and over again (as many of you do). But I have wanted to dine at Del Posto in New York City since I heard them speak at The Allergy Eats Conference for Restaurateurs last fall. It sounded like they were state of the art in dealing with food allergies and I wanted to see for myself. I finally got my chance last weekend.

I’d like to say that my husband surprised me with a day in the city, but the truth is that I made all the plans and informed him of the plans. When I made the reservations at Del Posto I notified them about my allergies (gluten and soy protein) and they seemed quite confident they could handle them.


First, I must make some observations about Del Posto that have nothing to do with food allergies. This is the type of restaurant where they bring you a little stool for your handbag (seriously, the bag I was schlepping around all day would have been fine on the spotless carpeted floor). It’s the type of restaurant where they bring you at least two utensils for each meal and take them away whether they have been used or not. It’s the type of restaurant where your napkin gets folded within 30 seconds of you leaving the table; they pull your chair out for you as you get up to visit the restroom (where did he come from?); they plate the sauces (always arriving in adorable containers) at your table; a bottle never sits on the table (and a glass is never empty); and they give you a clean napkin for dessert. It’s also the type of restaurant where a half-bottle of wine costs more than a case of what I usually drink.

This is a special occasion restaurant. (In addition to allergies, they ask about special occasions when the reservation is made.) Most of the tables near us (and none too near) were occupied by couples, a few with parties of four (two couples). I envision that many a marriage proposal has taken place at Del Posto – it is the type of restaurant where you might get down on one knee.

Now, the food. The first question our server (we actually had about 12 servers, but this one took our order) asked was if we had any allergies or restrictions. When I explained mine, he assured me that there would be no problem. I asked which dishes I might consider and he said, “All of them. We will adapt as needed.” I had perused the menu on the train, and had my eye on the fried calamari appetizer. When I asked about it he said they did it with a rice batter in a dedicated rice oil fryer. Nice!

The primary menu options are a 5-course or an 8-course meal. We chose the 5-course. Each of us could pick an appetizer, we could share two pasta dishes, and we each picked our own “secondi.” I thought that meant that my gluten-eating husband would have to share gluten-free pasta dishes with me, but no! Even though we had the same dish, they made one version with gluten-free pasta for me, and one with wheat pasta for my husband. And they did so graciously.

My one regret is that I wasn’t able to try the gluten-free focaccia (due to soy protein), but there was more than enough food!

We were served a plate of amuse-bouche (this is the type of restaurant where they serve an appetizer before the appetizer) – not one, but three, including this adorable avocado cucumber sandwich. All were safe without the need to adapt.


Without a doubt, my favorite dish was the fried calamari and zucchini. Baby zucchini was sliced on the horizontal and the rice batter and oil crisped everything up beautifully! When I asked more about the dish, I learned that they only make a gluten-free version – everyone who orders it gets the rice batter and oil. In fact, a key to Del Posto being able to successfully serve guests with food allergies is by designing the dishes with as few top allergens as possible. Almost anyone (except those with seafood allergies) would be able to have the calamari.


My pasta dishes each came with the same spiral rice pasta, whereas my husband was able to try some more exotic shapes.


The lobster (my main entrée) was also perfectly prepared, with no need to adapt to remove gluten.


Dessert was the only time where I wasn’t able to choose anything I wanted, but there were at least three gluten-free options. And, this is the type of restaurant where they serve you dessert after dessert, and give you a box of chocolates to take home.


Again, this is a restaurant that you save up to visit, but do go!

While you are here, check out the cookie swap and giveaway in progress.

Sunday, December 6, 2015

The Gluten-Free Holiday Cookie Exchange: Strawberry Thumbprints and a Cookbook Giveaway

Cookies, cookies, cookies! It's time for the Gluten-Free Cookie Exchange, hosted by Michelle Palin of My Gluten-Free Kitchen. Eighteen gluten-free bloggers are sharing their favorite cookie recipes, and each site is also giving away prizes. What could be better? Make some cookies, share them at your own cookie swap (or save them for yourself and Santa) and enter to win great prizes!

This recipe from The Allergy-Free Pantry is one of my favorites, and definitely worth sharing. And these cookies are not just gluten-free, they are also top-8 allergen-free! No dairy, eggs, nuts, or soy!

Looking for a top-8 allergen-free and gluten-free cookie for the holiday cookie swap? These strawberry thumbprints will wow them, for sure!

Strawberry Thumbprints
Makes about 28 cookies

Make these cookies with Strawberry Jam or another favorite jam. Ask the kids to help; a child’s thumb is just the right size to make thumbprints.

194 grams (about 1½ cups) gluten-free flour blend
½ teaspoon xanthan gum (omit if your flour blend contains a gum)
1 teaspoon baking powder
½ teaspoon salt
½ cup (110 g) organic cane sugar
10 tablespoons shortening, softened
1 Flaxseed Egg (1 tablespoon ground flaxseeds mixed with 3 tablespoons warm water)
1 teaspoon Vanilla Extract
¼ cup (61 g) Strawberry Jam

1. Combine the flours, xanthan gum, baking powder, and salt in a medium bowl.

2. In a separate large bowl, cream together the sugar and shortening using a mixer on medium speed for 5 minutes, scraping down the sides of the bowl as needed. The mixture will be light and fluffy.

3. Add the flaxseed egg and vanilla. Mix for 1 minute on medium speed.

4. Slowly add in the dry ingredients and blend on medium speed, about 2 minutes. The batter will be thick. Wrap the dough tightly in plastic and chill it for an hour. Cookie dough can be refrigerated for up to 2 weeks.

5. When you are ready to make cookies preheat the oven to 350°F (180°C). Line two large baking sheets with parchment paper.

6. Use your hands to shape the dough into balls, about 1¼ inches (3 cm) round.

7. Place the cookies on the baking sheet with space in between and flatten them just slightly. Use the tip of a finger, your thumb, or the back of a small spoon to create a small well in the center of each cookie.

8. Fill the center of each cookie with ¼ teaspoon of jam.

9. Bake each sheet of cookies separately in the center of the oven for 15 to 16 minutes, until the jam centers are sizzling and the edges of the cookies are golden. Let the cookies cool on the baking sheet for 5 minutes, then transfer them to a cooling rack. Store them in an airtight container at room temperature for up to 3 days.

To freeze
Baked cookies can be frozen in an airtight container for up to 3 months; thaw them at room temperature. Cookie dough (prepared through step 4) can be frozen for up to 6 months; thaw the dough in the refrigerator before forming cookies, filling with jam, and baking.

Credit line: Recipe from The Allergy-Free Pantry: Make Your Own Staples, Snacks, and More Without Wheat, Gluten, Dairy, Eggs, Soy or Nuts, copyright © Colette Martin, 2014. Reprinted by permission of the publisher, The Experiment. Available wherever books are sold.

And now for my giveaway:

One lucky reader will win signed copies of Learning to Bake Allergen-Free and The Allergy-Free Pantry. Also included in the prize package will be the most needed kitchen tool when baking gluten-free - a digital kitchen scale for weighing gluten-free flours!

Win these great prizes in the Gluten-free Cookie Exchange and Giveaway!

If you already own my cookbooks, you may choose to have them sent to someone else (or keep the signed versions and give your original copies away).

To enter:

Leave a comment here. Say whatever you like - tell us about your favorite cookie, why you'd like to win my cookbooks, or simply tell a joke. You have until Saturday, Dec 19th, at midnight to enter. The winner will be announced on December 20th. After leaving a comment, get your bonus entries:

a Rafflecopter giveaway


And be sure to visit all of the other participating sites and enter their giveaways:


Or click on an image below to be taken to the cookie you crave:


Gluten-free Chocolate Chip Butterscotch Cookies Recipe  from Vegetarian Mamma
Gluten-free Vegan Orange Chocolate Chip Cookies Recipe from Sarah Bakes Gluten Free
Gluten-free Snickerdoodles Recipe from Only Taste Matters
Gluten Free Vegan Ninjabread Men from Flippin' Delicious
Gluten-free Vanilla Wafers Recipe from gfJules
Gluten-free Cranberry Bliss Oatmeal Cookies Recipe from Making It Milk Free
Gluten-free Strawberry Thumbprints Recipe from Learning to Eat Allergy-Free
Gluten-free Holiday Sandwich Cookie Assortment Recipes from Go Dairy Free
Gluten-free Cranberry Lime Cornmeal Cookies Recipe from Cafe Johnsonia
Gluten-free Caramel Hot Chocolate Cookies Recipe from Faithfully Gluten Free
Gluten-free No Bake S'mores Cookies Recipe from My Gluten-free Kitchen
Gluten-free Dairy-free Sugar Cookies Recipe from Allergy Free Alaska
Gluten-free Pfeffernusse Recipe from Fearless Dining
Gluten-free Dark Chocolate Peppermint Cookies Recipe from Maebells
Gluten-free Flourless Chocolate Pecan Cookies Recipe from Around My Family Table
Gluten-free Chocolate Gingerbread Bars Recipe from Gluten-Free Palate
Gluten-free Snickerdoodles Recipe from Gluten-Free Homemaker
Gluten-free Christmas Wreath Cookies Recipe from Gluten-free Frenzy
Image Map

Tuesday, December 1, 2015

BFree Breads and Rolls - Product Review

I have been long been on a search for the best gluten-free rolls on the planet. To date, the best I have found are served at a couple of my favorite restaurants. But alas, they contain eggs. The same is true with packaged breads and rolls. The best gluten-free options contain eggs. I understand why they use eggs; eggs make baking much easier. But if you are allergic to eggs that leaves you with very limited options... until now.

The folks at BFree Foods contacted me to ask if I would like to sample their products. I was very happy to receive their pitch because for the past month I've been inundated with requests to review products and/or post recipes that contain nuts, or dairy, or even wheat. (These of course went straight to the trash bin.) But BFree had a product that was gluten-free and top-8 allergen-free and promised to be yummy. Bingo!


 Disclosure: BFree sent me complimentary samples of their products to try.

BFree was born in Ireland and is now starting to distribute their products in the US. Products include bread, bagels, rolls, and wraps. Each product type comes in two varieties -- white/plain and seeded. The seeds used vary by product but include sunflower, quinoa, poppy, flaxseed, and chia.

I have gotten used to searching for gluten-free bread in the frozen section, but BFree products will be on the shelves. And I am accustomed to keeping my bread in the fridge, but BFree bread can be stored at room temperature. And I am so used to having to toast my gluten-free bread before making a sandwich. There is no need to toast with BFree breads, but I have to admit I do like the rolls warmed up!

Best of all, these breads are totally awesome. They are soft and pliable and truly delicious.

BFree did something with the breads that I think might be genius -- they sliced the long way instead of the usual short way. No more wimpy slices. Why didn't I think of that?


So now, my sandwich can fill up the plate. Or, in my son's case, only one sandwich is needed instead of two.


I have a new favorite bread. I think you are going to love it too!


Tuesday, November 24, 2015

The Food Allergy Blogger Conference, Another Great Year

It’s been just a week since I arrived back home from the Food Allergy Blogger Conference (FABLogCon) in Denver, and I am suffering from withdrawal. There is something special and comforting about being in a room where everyone “gets it.” Where there is no need to explain. Where every bit of food served is something you can eat. Where everyone’s story is different and yet the same.

The third annual (yes, Jenny, I used that word again) conference was a raging success!

There is way more than can be said in a single blog post, but I will do my best to do it justice.

Thank you to all of the amazing sponsors, especially top-tier sponsors Sanofi, Enjoy Life Foods, Sunbutter, EAT, Mylan, and Ogilvy. A conference like this simply isn’t possible without sponsorship. Here’s a peek at some of the SWAG I brought home:


The food at the Denver Renaissance was amazing. Everything was gluten-free and the staff was great at making sure my meal didn’t contain soy. Thank you Chef’s Keith, Keith, and Charles!!

I was lucky to have won the prize package from Coconut Secret:


I am especially looking forward to the coconut aminos. Could this be the soy-free soy sauce I have been looking for?

I had the opportunity to share the stage with Alisa Fleming, Chandice Probst, and Sally Ekus on the topic of pitching your ideas. These ladies rock!

I am glad that I was able to spend some time (finally) with Michelle Palin, Holly Yzquidero, and all my new friends. It seems there is never enough time.


I spent most of my time in the blogger track and came home with pages of notes of things I need to do/fix/learn.

I’m bummed that I missed Missy’s Social Media Bootcamp (rack that up to a Delta Airlines snafu), but I have the charts to review.

As always, thanks to the social-media-savvy girls who never fail to teach me something new – Keeley, Cindy, Annelies, Michelle – and to Ritesh for making my to-do list twice as long as it was prior to his session.

Thanks to Mary Fran Wiley for teaching me how to put alt-text in my photos in blogger (how did I not know this?) and going above and beyond to help me get social share buttons on my website.

Thanks to Erica Dermer for making me laugh.

Thanks to Ritesh for working behind the scenes on the tech (and doing it in a way that no one even noticed).

The biggest thanks (of course) go to the Queen of the Conference, Jenny Sprague. Her passion and vision sustain us all.

There were so many people I missed this year, including Tanya O’Brien, Peggy Trefts, Pam Jordan, Lori Sandler, Lynda Mitchell, Gina Mennett-Lee, Laurel Francouer, Homa Woodrum, Selena Buntzer, Lisa Musician, Rachel Hayden…. I could go on. But I hope we see you next year (yes, Jenny, I said it again).

Monday, November 23, 2015

Cranberry Sauce Made Better

Cranberries are a must for my holiday table. Cranberry muffins will be my choice of bread and of course, cranberry sauce must be served with turkey.

The secret ingredient in this essential cranberry sauce is mustard seeds. A must try!

I have been making a version of this cranberry sauce for years. I used to say that pineapple was the secret ingredient, but I have now discovered a way to make it even better. The new secret ingredient? Mustard seeds! Of course, those allergic to mustard should leave out the seeds. The original version without seeds is great too! Either way, it is so much better than those cranberry jellies!

Cranberry Sauce

2 cups fresh cranberries, washed and strained
1 cup orange juice
1/2 teaspoon mustard seeds
1 cup chopped pineapple
2 tablespoons honey

Bring the cranberries, orange juice, and mustard seeds to a boil in medium saucepan over high heat. Reduce the heat to med-high and boil until the cranberries begin to pop open (3-4 minutes).


Add the pineapple chunks. Reduce the heat to low and simmer until the sauce starts to thicken (about 10 minutes).

Add the honey and continue simmering another 2-3 minutes.

The best cranberry sauce at Learning to Eat Allergy-Free

Let the cranberry sauce cool and then chill until you are ready to serve.

Tuesday, November 17, 2015

Nutiva Shortening -- Product Review

Every so often I come across a new product at the grocery store that is calling my name. I had spied this Nutiva shortening a few weeks ago, and finally decided to splurge and give it a try.


The problem with shortening for those of us with food allergies is that most shortening is  combination of oils (and sometimes other ingredients) -- and each ingredient added means that some set of folks out there can't use it. Until now, the only single ingredient products I have found that can be used as shortening are coconut oil and Spectrum Organics shortening (all palm fruit oil). The Nutiva shortening caught my eye because it's just palm fruit oil and coconut oil.

The product actually contains two types of palm oil -- palm fruit oil and red palm oil. Red palm oil is red in color when in its natural state. This is likely what accounts for the deep golden yellow color of the shortening:


I put the shortening to the test on a cake recipe that I've been working on -- the type of cake where you must cream the sugar with the shortening. And I was disappointed. No matter how hard I tried (or how long I mixed) my batter ended up lumpy. I considered dumping it, but decided to go ahead and bake it and see what happens. In the end, the cake was okay, but I think I'll stick with my old standby's for shortening:


Tuesday, November 10, 2015

Bob's Red Mill Gluten Free Oatmeal To-Go Cups - Product Review

A couple of weeks ago I received a surprise in the mail. I love surprise packages! This time it was a sample box of Bob's Red Mill new oatmeal cups.


 Disclaimer: I received a complimentary sample of this product from Bob's Red Mill.

I am an oatmeal-for-breakfast person. On most days I make a batch of either Bob's Red Mill gluten-free old-fashioned oats or Udi's gluten-free steel cut oats. I make them on the stovetop because I believe they taste better this way. But when I'm traveling this isn't possible. My solution is to bring measured portions of Bob's Red Mill quick-cooking gluten free oats. Since most hotel rooms not include coffee makers, I pour my oatmeal into a coffee cup and heat up water with the coffee maker. I have been making my own to-go oatmeal cups, but I don't need to anymore!

These cups come in four flavors -- classic, brown sugar and maple, apple pieces and cinnamon, and blueberry and hazelnut. The only unsweetened cup is classic (but feel free to add your own sweetener, blueberries, bananas, etc. All flavors contain chia and flax. Want some fiber? all contain at least 7 grams of fiber.

Now for the test.

They are quite easy to prepare following the directions on the cup. Boil water, fill to the water line, stir, cover and let it sit for 3 minutes. Voila! perfect oatmeal:


Pictured above is the blueberry hazelnut. This is the only flavor that contains nuts, but all contain a "manufactured in a facility that also uses tree nuts and soy" warning.
 
These will work great for on the road breakfasts (using the hotel coffee maker). Just don't forget to bring a spoon!


Tuesday, November 3, 2015

White Rice Flour vs. Brown Rice Flour

We have all heard it – brown rice is better for you than white rice, right?

One cup of cooked long-grain brown rice clocks in at 216 calories with 5 grams of protein and 4 grams of fiber.

One cup of cooked long-grain white rice clocks in at 205 calories with 4 grams of protein and 1 gram of fiber.

Above data according to nutritiondata.com.

So, yes, we will call brown rice the winner here. But what about brown rice and white rice flours? So much of our gluten-free and allergen-free food contains these ingredients and I like to know what I’m eating!


Is brown rice flour healthier than white rice flour? Let’s compare using some popular brands:

Authentic Foods brown rice superfine flour has 140 calories in a ¼ cup serving, with 3 grams of protein and 1 gram of fiber.

Authentic Foods white rice superfine flour has 150 calories in ¼ cup, with 2 grams of protein and 1 gram of fiber.

Bob’s Red Mill gluten free brown rice flour also has 140 calories in a ¼ cup serving with 3 grams of protein, but it has 2 grams of fiber.

Bob’s Red Mill gluten-free white rice flour has a similar profile to Authentic Foods, clocking in at 150 calories with 2 grams of protein and 1 gram of fiber.

To compare King Arthur Flour’s gluten free brown rice flour, I needed to normalize the serving size by grams (because this flour is lighter than the others). Here, a serving size is 1/3 cup, with 146 grams, with 2.5 grams of protein and 1.3 grams of fiber.

It appears that the gap between white rice and brown has narrowed considerably when talking flour – enough that I would call it a draw. There is a greater variance by brand than by variety.

What flours do you use to add more protein to a gluten-free flour blend?

Tuesday, October 27, 2015

Just Mayo Prevails - A Story and Product Review

A few weeks ago I posted an article on facebook about a product called Just Mayo by Hampton Creek and the American Egg Board's efforts to take them down. Here's the gist...

Hampton Creek created an egg-free product -- let's call it sandwich topping -- that would compete with traditional mayonnaise. Compete? Well, sort of. "Just Mayo" as the product is called, is marketed to vegans, those with food allergies, and those who need to avoid eggs (for whatever reason). Nary an egg to be found in this product (or any other animal ingredients, for that matter). So the president of the American Egg Board (seriously, do we need to spend taxpayer dollars on promoting eggs?) sent e-mails declaring that Hampton Creek had to be stopped. It was basically an executive version of the Big Bad Wolf's, "We'll huff and we'll puff and we'll blow their house down." The product was declared a "crisis and a major threat," and Egg Board officials tried to get the product pulled from grocery store shelves.

I believe that a key problem the Egg Board Chief didn't acknowledge is that if folks like you and me couldn't find Just Mayo on the grocery store shelves we wouldn't choose traditional mayonnaise.  Instead, we would buy mustard, or make our own, or choose nothing. Okay, end of rant and back to story.

But Hampton Creek not only didn't give up, they went on the offensive by using the Freedom of Information Act to obtain the documents and give them to the press, resulting in a wave of support for Hampton Creek. The NPR version of the story can be found here.

There is the nasty lingering problem of the FDA, who (in their infinite wisdom) has defined mayonnaise as needing to contain eggs, and has sent Hampton Creek a letter saying they are in violation of FDA standards. Sigh... once again, our tax dollars at work.

Nevertheless, I am happy to be able to say that I have tried Just Mayo and I love it! Hampton Creek sent me a complementary assortment:


I must admit that I am a bit of a "mayo" snob.  (Am I still allowed to use that word? I'll put it in quotes to denote that I mean it broadly and not strictly defined, will that do?) Since writing my second book I have been making my own egg-free "mayo." In Allergy-Free Pantry I introduced Flaxseed "Mayo" and more recently I have been making "mayo" with aquafaba. I LOVE making homemade "mayo" or sandwich topping.

What I have learned from dozens of experiments and after wasting many gallons of oil is that at its core, "mayo" is an emulsion that must contain protein and fat. All other ingredients are for flavor and to help stabilize and/or preserve. Yes, in traditional mayonnaise that protein component is provided  by the egg white. In flaxseed "mayo" I used flaxseed eggs, in aquafaba "mayo" I used bean brine. Hampton's Creek solution in Just Mayo is to use pea protein. Love it!

Allergy-friendly sabdwich made with Hampton Creek's Sriracha Just Mayo, Yummy!

As promised, I tried sriracha first. It's just spicy enough without being overpowering. I love the creaminess and the ability to squeeze it right out of the jar. It makes a great sandwich and I can't wait to try it on a burger! And, I should mention that it's not only egg-free, it's cholesterol-free, dairy-free, gluten-free, soy-free, and contains no gmo's.

Let me know if you have tried it and what you think!


Tuesday, October 20, 2015

Earth Balance Mac and Cheese - Product Review

Yes, I've been doing a lot of reviews lately. The good news is there are soooo many new products to try (yippee!). The bad news is that it's hard to keep up with them all. This is one I am very excited about.

I have been an Earth Balance fan since I started baking allergen-free. In my opinion, their shortenings and spreads are simply the best -- both in test and performance. I had high expectations for this complimentary sample of Earth Balance Gluten Free Vegan Cheddar Flavor Mac and Cheese.


Mac and Cheese was a staple in my house prior to food allergies. It was the ideal quick meal to prepare for myself and two young boys after a long day at work. One pot, limited add-ins, fast results.
Again, gearing up for high expectations from the Earth Balance version.

Of course, this mix contains no dairy, eggs, or real cheese. All you need to add is buttery spread (or shortening) and your favorite non-dairy milk. And it's gluten-free, the noodles are made from corn and rice flours. No top-8 allergens.

Like the traditional version, I was able to make this all in one pot:


I was delighted at how easily the powder mixed with the ingredients. No lumps or bumps.


I decided to add peas and tuna to make it a meal. (I know, no longer vegan and no longer top-8 free, but we don't have fish allergies here). It was indeed very tasty and I daresay, as close to the traditional as you can get. Kuddos to Earth Balance!

One slightly bizarre things I noticed was the number of servings per box, listed as 2 1/2. My sense was that it was closer to 2 servings. If I had sent this to my son in a care package to college he would have easily eaten it all in one sitting (with a steak on the side). He is an athlete, but my point is, the servings are small. Buy two boxes if you plan to serve it to the whole family.

Note that the gluten-free version come in the teal box (love that everyone is embracing teal!) The version in the gold box is not gluten-free.

Tuesday, October 13, 2015

150 Best Spiralizer Recipes – Book Review

About a year ago I bought myself a spiralizer. What’s a spiralizer, you ask? It’s a gadget that allows you to make long, spaghetti-like strands or ribbons from zucchini and other vegetables. It’s a lot of fun and gives you many new options for how to prepare food.

But I was in a rut. I had been spiralizing (yup, that’s a verb now) zucchini, summer squash, and all types of potatoes, but not a lot more. So I was excited to receive a review copy of 150 Best Spiralizer Recipes by Marilyn Haugen and Jennifer Williams.


Oh, so many new ideas.

It had never occurred to me to spiralize carrots, but the first recipe I tried, Curly Zucchini, Carrot, and Celery Casserole, suggested I do just that. I struggled. My carrots weren’t wide enough to be secured in my spiralizer (despite using the largest carrots I could find). I resorted to using a vegetable peeler to make long carrot ribbons. The recipe was indeed delicious.

Next I tried spiralizing delicata squash to make Garlic and Herb Lemon Chicken with Roasted Spiral Squash. Again, I struggled. Once removing the seeds from the center, I no longer had a center point to attach the squash to my sprializer.

At this point I did a bit of research on spiralizers and discovered there is an entirely different style of gadget that might work better with these recipes than the Paderno model I have been using. While I might not be spiralizing everything, the recipes gets a big thumbs up!

There are fantastic recipes in this book for those with food allergies. Veggies take center stage (translation: healthy) and I love that the book is arranged by gluten-free, paleo, vegetarian and vegan, and raw food recipes. There are dozens that are top-8 allergen-free as written, and many that can easily be modified to be allergen-free.

Tuesday, October 6, 2015

Bars from Freedom Foods - Product Review

After too many experiences when I have found myself stuck in an airport, or in a location that is nowhere near suitable food, or even just in a car and stopping at a rest stop, and not having anything to eat, I always - I repeat always - bring snacks and breakfast when I travel. Often I choose to bring instant gluten-free oatmeal along on trips. It can be made with the water from the coffee maker in a hotel room, but these oat bars that Freedom Foods sent me to try are a great alternative:


They are top-8 allergen-free and sesame-free, gluten-free, and low in sugar. In addition to the cranberries and seeds variety that you see above (and what I tried below), they come in chia with apricot and apple cinnamon flavors. I love that they are low in sugar (just 6 grams per bar).


And these are no wimpy bars. That's a 6-inch plate the bar is sitting on. I don't think I will still be hungry afterwards. 


The real test, of course, is how it tastes. I love love love these bars. It tastes the way a breakfast bar or a low-sugar snack bar should. Just plain good.

Tuesday, September 29, 2015

Amore di Mona Chocolate - Product Review

You know me, I love chocolate. When in doubt, bake it chocolate. When in crisis, eat chocolate.

I was intrigued by the Amore di Mona chocolates, as soon as a complimentary package arrived at my door. The packaging suggests that this is no ordinary chocolate:


The chocolate is gluten-free, dairy-free, egg-free, soy-free, nut-free, AND low glycemic (billed as "diabetic-friendly"). Wow, that's a feat! The sweetener used is agave nectar. All of the ingredients are sourced from the best. Let's look inside that gift box:


Oh, which to try first... There are hard chocolates, and caramels. I picked a Caramela to start:


The chocolate has a smooth taste and feel, doesn't read as sweet as other "dark" chocolate, and not overpowering. But let's talk about the caramela:


The real treat here is the caramel. The caramels are silky, smooth, and melt in your mouth. No hard "break your teeth" caramels here. Oh, so, good. Yup, if you try this brand, you must try the caramels! (affiliate link)