Thursday, October 30, 2014

One Blender + One App = Smoothies!

I continue to be amazed by the super-talented Tess Masters. Releasing her first book, The Blender Girl, and blazing a trail around the world for her book tour simply wasn’t enough to accomplish in one year. Tess’s latest achievement is her new Smoothie app – The Blender Girl Smoothies app for iphone and ipad.

The new app, available on the itunes store for $4.99 has 70 smoothie recipes (and more coming). I love that you can search by ingredient. If you have lots of bananas, for example, search for smoothies that use bananas. Or, search using the ingredients that are safe for you and your family. The recipes also include special dietary information. For example, if you need more protein, or anti-inflammatory smoothies, you will find them here.

There’s something here for everyone (and it’s very allergy-friendly). Here’s an example of what you can find (this is the ipad view):


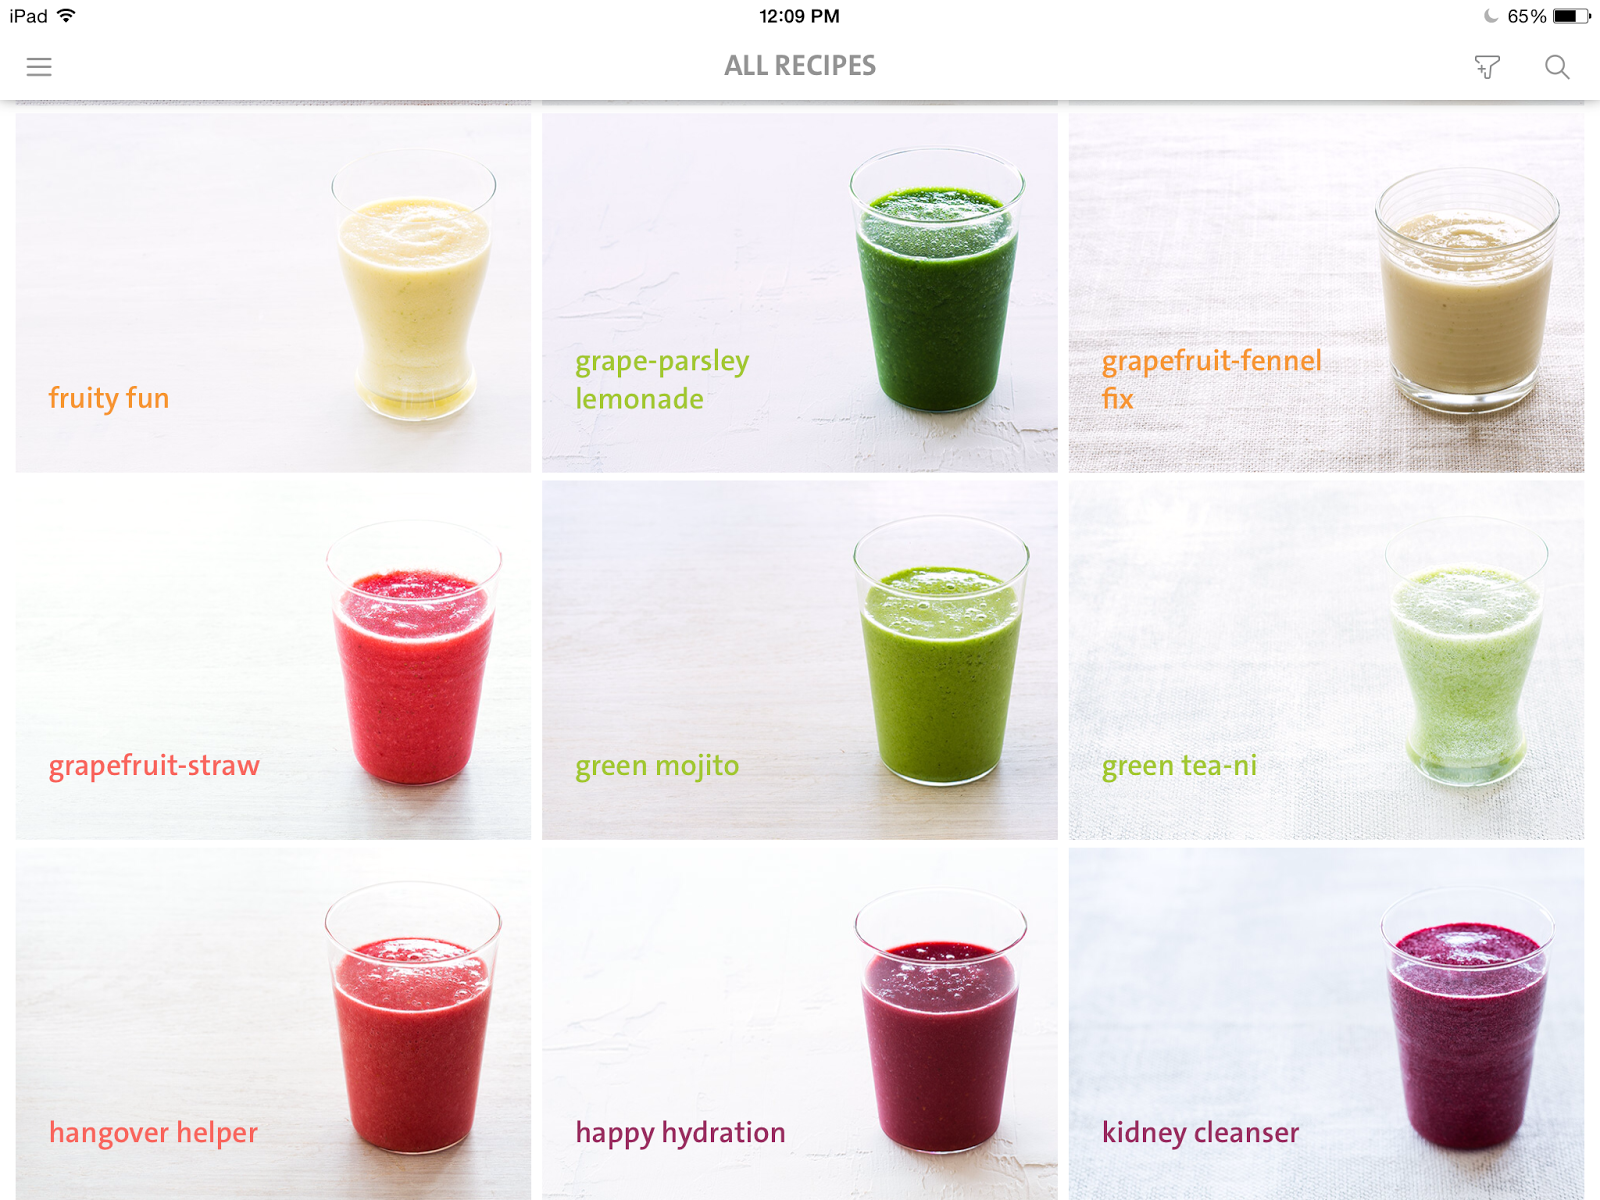
Don't you love the colorful smoothies?

Here’s a sneak peek of a smoothie recipe that contains some of my favorite ingredients (and who could pass up an anti-aging smoothie?):

pomegranate slam it!

With a complex, mind-blowing flavor that explodes like a firecracker (don’t omit the cayenne), this is a heart-healthy delight. Pomegranate lowers blood pressure, keeps arteries supple, decreases inflammation in blood vessels, and helps manage cholesterol. Its phenolic antioxidants (also in strawberries) combat oxidative stress, making this an anti-aging tonic.

Serves 2

1 1/2 cups (360ml) unsweetened pomegranate juice
1 orange, peeled, seeded, and quartered
1/4 cup (35g) chopped red bell pepper
1/8 cup (3g) loosely packed arugula
1/2 small avocado, pitted and peeled
1 cup (160g) frozen strawberries
1 cup (125g) ice cubes

Throw all of the ingredients into your blender and blast on high for about 1 minute, until smooth and creamy.

Boosters
1 tablespoon pomegranate powder
1/2 cup (15g) loosely packed chard leaves
Pinch of cayenne pepper

Credit and permission: Recipe from The Blender Girl Smoothies app © Tess Masters, copyright (c) 2014. Published by Ten Speed Press, an imprint of Random House LLC.
Photo by Erin Kunkel from The Blender Girl Smoothies app © Tess Masters, copyright (c) 2014. Published by Ten Speed Press, an imprint of Random House LLC.

Tuesday, October 28, 2014

Chocolate Croissants from Learning to Bake Allergen-Free

Last week I shared a couple of favorite recipes from The Allergy-Free Pantry.Today, I am sharing a favorite from Learning to Bake Allergen-Free.

You might not be able to have eggs or traditional cereal with milk for breakfast, but yes, you can have chocolate for breakfast with this gluten-free, dairy-free, egg-free recipe!

These gluten-free and top-8 allergen-free Chocolate Croissants are the #1 fan favorite from Learning to Bake Allergen-Free. You must try them!
Chocolate Croissants

The French refer to chocolate croissants as pain au chocolat. Translated literally, this means “chocolate bread,” and there’s no better place to get it than a street-side cafĂ© in Paris. Unless of course you need an allergen-free version—in which case you’ll want to make your own at home.

When making a puffed pastry or croissant with traditional ingredients, it’s typical to use puff pastry dough. These are unleavened, made with multiple layers of wheat dough, and lots of butter. The technique to make this dough takes advantage of the gluten in the flour, and results in flaking when baked. Since we’re baking without gluten, my recipe uses yeast to provide some lift. It won’t be as flaky as a croissant made from wheat and butter, but it still gives you that rich, decadent experience you would expect from chocolate bread, and it’s lower in fat.


Makes 8 Croissants

1½ cups gluten-free flour blend (192 grams)
¼ teaspoon xanthan gum (leave out if your flour blend contains xanthan gum)
2¼ teaspoons quick-rising yeast
¼ cup sugar
¼ teaspoon salt
2 teaspoons baking powder
¼ cup grapeseed oil
¼ cup warm water
1½ teaspoons Ener-G Egg Replacer mixed with 2 tablespoons warm water (equal to 1 egg)
1 teaspoon vanilla extract
Up to 3 tablespoons warm water (as needed)
Up to 2 tablespoons additional flour for dusting
¾ cup allergen-free chocolate chips

1. Line a baking sheet with parchment paper.

2. Combine the flours, xanthan gum (if needed), yeast, sugar, salt, and baking powder in a medium bowl. Set it aside.

3. Blend the oil, water, egg replacer mixture, and vanilla together in a large bowl, using a mixer on medium speed, about 1 minute.

4. Slowly add the dry ingredients to the wet mixture, mixing on medium-low speed, until combined.

5. Beat for 5 minutes on medium-high speed, until the dough is pulling away from the sides of the bowl. Add up to 3 tablespoons warm water, ½ tablespoon at a time, as needed.

6. Spread a thin layer of flour on a smooth prep surface. Scoop the dough on top of the flour.

7. Use a bench knife or sharp-edged knife to divide the dough into eight equal-sized cubes.

8. Coat each portion lightly with flour.

9. Use a rolling pin to roll out each cube into a rectangle about 6 inches long and 4 inches wide. Place them on the prepared baking sheet.
10. Place chocolate chips in the center third of each rectangle, and fold the flaps over the chocolate. Place a drop of water under the top flap to help it stay in place, and tuck it under so it stays secure.

11. Proof for 35 to 45 minutes.

12. With 5 minutes left to rise, preheat the oven to 350°F.

13. Bake at 350°F for 12 to 16 minutes until the tops are lightly browned and the chocolate is bubbling around the edges.

14. Let the croissants cool completely, and then decorate with chocolate glaze:

Decorating Chocolate Croissants from Learning to Bake Allergen-Free is easy!

Tips

• Note that the temperature for baking the croissants is 350°F, lower than most yeast bread recipes. You don’t want to burn the chocolate by baking it at too high a temperature.
• Use your favorite gluten-free flour blend or ¾ cup brown rice flour, ½ cup sorghum flour, and ¼ cup tapioca starch.

Credit line: Recipe from Learning to Bake Allergen-Free: A Crash Course for Busy Parents on Baking without Wheat, Gluten, Dairy, Eggs, Soy or Nuts, copyright © Colette Martin, 2012. Reprinted by permission of the publisher, The Experiment. Available wherever books are sold.

You won't want to wait for these gluten-free Chocolate Croissants to cool, they are so yummy!

Thursday, October 23, 2014

Flaxseed Mayonnaise from The Allergy-Free Pantry

I have a lot of favorite recipes in my books. Each one was crafted with love and care. But of all the recipes in The Allergy-Free Pantry, this is the one I am most proud of. It took weeks (and a lot of failed attempts) to develop this completely egg-free and dairy-free mayonnaise. And while there is no such thing as a patent or a trademark on recipes, this is about as close as you can get to a "recipe invention." This is also one of the recipes that I make most often, and use to make so many other recipes, including Ranch Dressing, Mock Caesar Dressing, and Potato Salad.

I hope you enjoy it as much as I do!

Yes, this mayonnaise is egg-free, dairy-free, gluten-free, soy-free. Made with flax seeds, it's better than the original! Flaxseed Mayonnaise from The Allergy-Free Pantry.

Flaxseed Mayonnaise


Makes 1¼ cups (300 ml)

Because this mayonnaise starts with flaxseeds rather than eggs, it has the benefit of being both healthier and tastier than traditional mayonnaise. Even if you aren’t allergic to eggs, this might just be the best sandwich topping you have ever tried!

Use measuring cups with a spout to measure the oil; this will allow you to pour the oil directly into the container for your blender when making mayonnaise.


2 Flaxseed Eggs (2 tablespoons ground flaxseeds (measured after grinding) or flaxseed meal combined with 6 tablespoons warm water)
½ teaspoon salt
1 teaspoon Mustard, or ¼ teaspoon ground mustard seed
1 tablespoon fresh lemon juice
½ cup (120 ml) organic canola oil
½ cup (60 ml) light olive oil

1. Combine the flaxseed eggs, salt, mustard, and lemon juice in a working glass or the container for your immersion blender, blender, or food processor. Pulse four or five times to combine the ingredients.

2. With the blender running continuously, pour a few drops of canola oil into the container. The slower you pour, the better. The mixture will start to become creamy as emulsification occurs.

3. Continue blending and adding oil in a slow trickle until all of the oil is incorporated; add all of the canola oil first and then the olive oil. If the oil starts to pool on top of the mixture, slide your immersion blender up and down ½ inch, or stop pouring until the oil combines.

4. Cover and refrigerate for up to 1 week. The mixture will set further as it chills.

To substitute
A single oil or any combination of oils (up to ¾ cup/180 ml total) can be used to make this mayonnaise, with the exception of coconut oil or palm fruit oil (which behave differently). Use less oil for a thinner spread.

Variation

Make Chia Seed Mayonnaise by substituting 2 Chia Seed Eggs for the Flaxseed Eggs.

Credit line
: Recipe from The Allergy-Free Pantry: Make Your Own Staples, Snacks and More Without Wheat, Gluten, Dairy, Eggs, Soy or Nuts, copyright © Colette Martin, 2014. Reprinted by permission of the publisher, The Experiment. Available wherever books are sold.

Monday, October 20, 2014

Potato Salad Recipe from The Allergy-Free Pantry

Over the next few weeks (and just in time for the holidays) I plan to share a few recipes from Learning to Bake Allergen-Freeand The Allergy-Free Pantry. (affiliate links)

I decided to start with a recipe for Potato Salad, because I happen to have a lot of potatoes right now due to the end of season harvest at the CSA. Perhaps you do too. Enjoy!


Potato Salad


Makes 10 to 12 servings

Friends and neighbors will have no idea that this allergen-free version of potato salad was made without traditional mayonnaise or off-the-shelf salad dressings. Instead, Flaxseed Mayonnaise (page 99) is used to make a salad with added fiber and essential fatty acids—and that tastes marvelous! Add some blue potatoes, if you can find them.

Even though this potato salad contains no eggs or dairy, be careful not to let it sit out longer than an hour; it’s the potatoes, not the mayonnaise, that contain the bacteria that can make you sick.

10 to 12 medium Yukon Gold and Red Gold potatoes, with skins, cubed
1 teaspoon salt
About 5 cups (1200 ml) water
1 medium red onion, diced
2 tablespoons diced Dill Pickles, optional
½ cup (120 ml) Flaxseed Mayonnaise
2 tablespoons chopped fresh dill
1 tablespoon chopped fresh cilantro

1. Place the potatoes and ½ teaspoon salt in a large pot. Cover with water and bring to a boil over high heat.

2. Lower the heat to medium and continue boiling for 10 to 15 minutes, until fork-tender but not falling apart.

3. Place the potatoes in a strainer and run cold water over them for 30 seconds to halt the cooking. Drain the potatoes well.

4. Combine the onion, pickles (if desired), flaxseed mayonnaise, herbs, and remaining ½ teaspoon salt in a large bowl. Add the potatoes and stir to coat.

5. Cover and chill the potato salad for at least an hour before serving. It will keep for 3 days in the refrigerator.

Credit line:
Recipe from The Allergy-Free Pantry: Make Your Own Staples, Snacks and More Without Wheat, Gluten, Dairy, Eggs, Soy or Nuts, copyright © Colette Martin, 2014. Reprinted by permission of the publisher, The Experiment. Available wherever books are sold.

Thursday, October 16, 2014

Things I Learned at FABlogCon

I don’t dare try to do a recap post on the 2014 FABlogCon in Las Vegas. I can’t possibly thank everyone that needs to be thanked. I can’t possibly mention all of the tremendous souls I reconnected with and those I met for the first time. I can’t possibly mention all of the great moments. There were too many moments, each and every person who attended is special, and far too many need to be thanked. So I won’t try. Suffice it to say that there is no event quite like this one, where the entire food allergy community can come together and feel safe, loved, and understood.

Instead, I want to mention a few (of the many) “bloggy things” that I learned at the conference.

Thanks to Pam Jordan, Keeley McGuire, and Cindy Gordon, I have a much better idea of how to use Pinterest. Oh, the many things I have been doing wrong there… These lovely ladies explained that I need to think of Pinterest as a stream (like I do with twitter) rather than a static pin board. That was a bug “ah-ha” moment!

Ritesh explained that if I am going to change a tweet when I retweet it (usually necessary to add text when retweeting) that I should label it “MT” (modified tweet) rather than RT (retweet). Ritesh called this “good manners.” Apparently I have been a bad girl ☹.

I also learned that I can pin a tweet to top of my twitter page and that I can pin a post to the top of my facebook page. (Where have I been?)

And my favorite blogging tip is also thanks to Ritesh. I decided to create a video trailer for The Allergy-Free Pantry, using Animoto. Check it out:

The Allergy-Free Pantry Trailer

Monday, October 13, 2014

Announcing the Winner of the Hamilton Beach Slow Cooker

And the winner of the Hamilton Beach Slow Cooker is:

Anne, from Freckled Faced Adventures

Congratulations Anne, you are going to love this machine! Have some great #slowcookermeals!


Monday, October 6, 2014

Hamilton Beach Slow Cooker Review and Giveaway (and Making Black Beans)

Today I am reviewing the Hamilton Beach Set 'n Forget® 6 Qt. Programmable Slow Cooker With Spoon/Lid. I received a free slow cooker to try, and I have one to give away to a reader here, compliments of Hamilton Beach (see The Giveaway, below).

In my house the slow cooker is a 3-season tool; I like to use it from fall through spring. I pull it out on the first chilly fall day, before the heat has been turned on in the house, when it’s nice to have something warming all day in the kitchen.

I decided to give the slow cooker a test with a very simple recipe – making black beans. I use beans a lot (we’re trying to eat less meat here), and black beans lend themselves perfectly to be made in a big batch because they freeze beautifully.

But before I make the beans, let’s take a look at the slow cooker. I’ve never owned a programmable slow cooker before, and was intrigued by the concept. In the past, I would set it in the morning and come home from work to find my meal cooked, but possibly overcooked. This slow cooker’s features allow me to cook for just the right amount of time!


I was immediately struck by how solid this slow cooker is. The oval vessel is a nice heavy stoneware, that looks to be very easy to clean and dishwasher safe. It’s a very allergy-friendly vessel! The glass lid is heavy and solid, with a rubber seal that sits very nicely on top of the stoneware vessel.


The lid has a hole for the thermometer – a fantastic feature if you want to cook meat! And yes, you can program the slow cooker to turn to warm when it reaches just the right temperature.


The lid can be clamped down with clips on the sides for carrying your warmed chili to the potluck dinner. I found the clips difficult to clamp down, but I expect they will loosen up over time. There is also a slot in the handle of the lid for holding a spoon (included) to carry to the potluck dinner (how many times have you gotten there and realized you forgot a spoon?).

Ready to make some black beans? Instead of buying black beans in a can, making them yourself is a fabulous way to save money, not mention control over ingredients and avoiding cross-contamination.

Rinse 2 pounds of black beans. Remove any broken or discolored beans. Place the beans in the vessel for the slow cooker. Cover the beans liberally with water; use 14-15 cups. Luckily, this slow cooker can accommodate that! At this stage it’s not possible to use too much water, but it is possible to use too little water. The goal is to let the beans absorb as much water as possible – they will expand as they do so. Cover the vessel and let the beans soak overnight.

In the morning, skim any floaters from the top. Drain the water from the beans. Place the beans back in the slow cooker vessel and add just enough water to cover them (about 5 cups) and 1 tablespoon of salt. Cook on low for 6 hours.

I decided to program the slow cooker for 6 hours on low, and found it very easy to do so. With the program mode, the slow cooker will automatically switch to “warm” when it reaches the time limit – something I wanted to test.

At about 3 hours, skim the foam. After cooking on low for 6 hours (or whenever you come back to it after it turns to warm), check the beans to see if they are done. At this point you may choose to add up to 1 tablespoon more of salt (depending on your preference). Cook the beans for up to 2 more hours, checking them every 30 minutes, until they are done. Mine took exactly 7 hours, total.


Now, back to the slow cooker. I must tell you that I have discarded many slow cookers over the years due to running too hot on low, the outer vessel getting too hot, or just being the wrong size. Some of these were expensive/high-end slow cookers. I don’t think I’ve found another one that I like as much as the Hamilton Beach Set 'n Forget® 6 Qt. Programmable Slow Cooker .

I love the programmability, but what I like best about the machine is the size and design. The large vessel with the glass lid is well positioned so that there is no leakage and no mess inside the slow cooker where the heating elements are. The low temperature was truly low (thank you Hamilton Beach!), and I could touch the outside of the slow cooker while running without fear of burning myself. Even the cover design is such that you don’t need to use an oven mitt to open it. This is one fine machine that is replacing what I was using previously.

I could live without the clips on the side and the spoon holder in the lid, but that might be a great feature for you if you tailgate a lot. The one design change I would make is to lengthen the electrical cord. I had to rearrange the appliances on my countertop to be able to get this close enough to an outlet to plug in. (The cord is about 2 feet long, 3 feet would have been perfect.)

The Giveaway


Now, one of you can win a Hamilton Beach slow cooker. Simply leave a comment below with what you’ll make first in your slow cooker. The slow cooker will be shipped to a randomly chosen winner from Hamilton Beach. You have until midnight on Saturday October 11th to enter. The winner will be announced on Monday, October 13th. Good luck!